


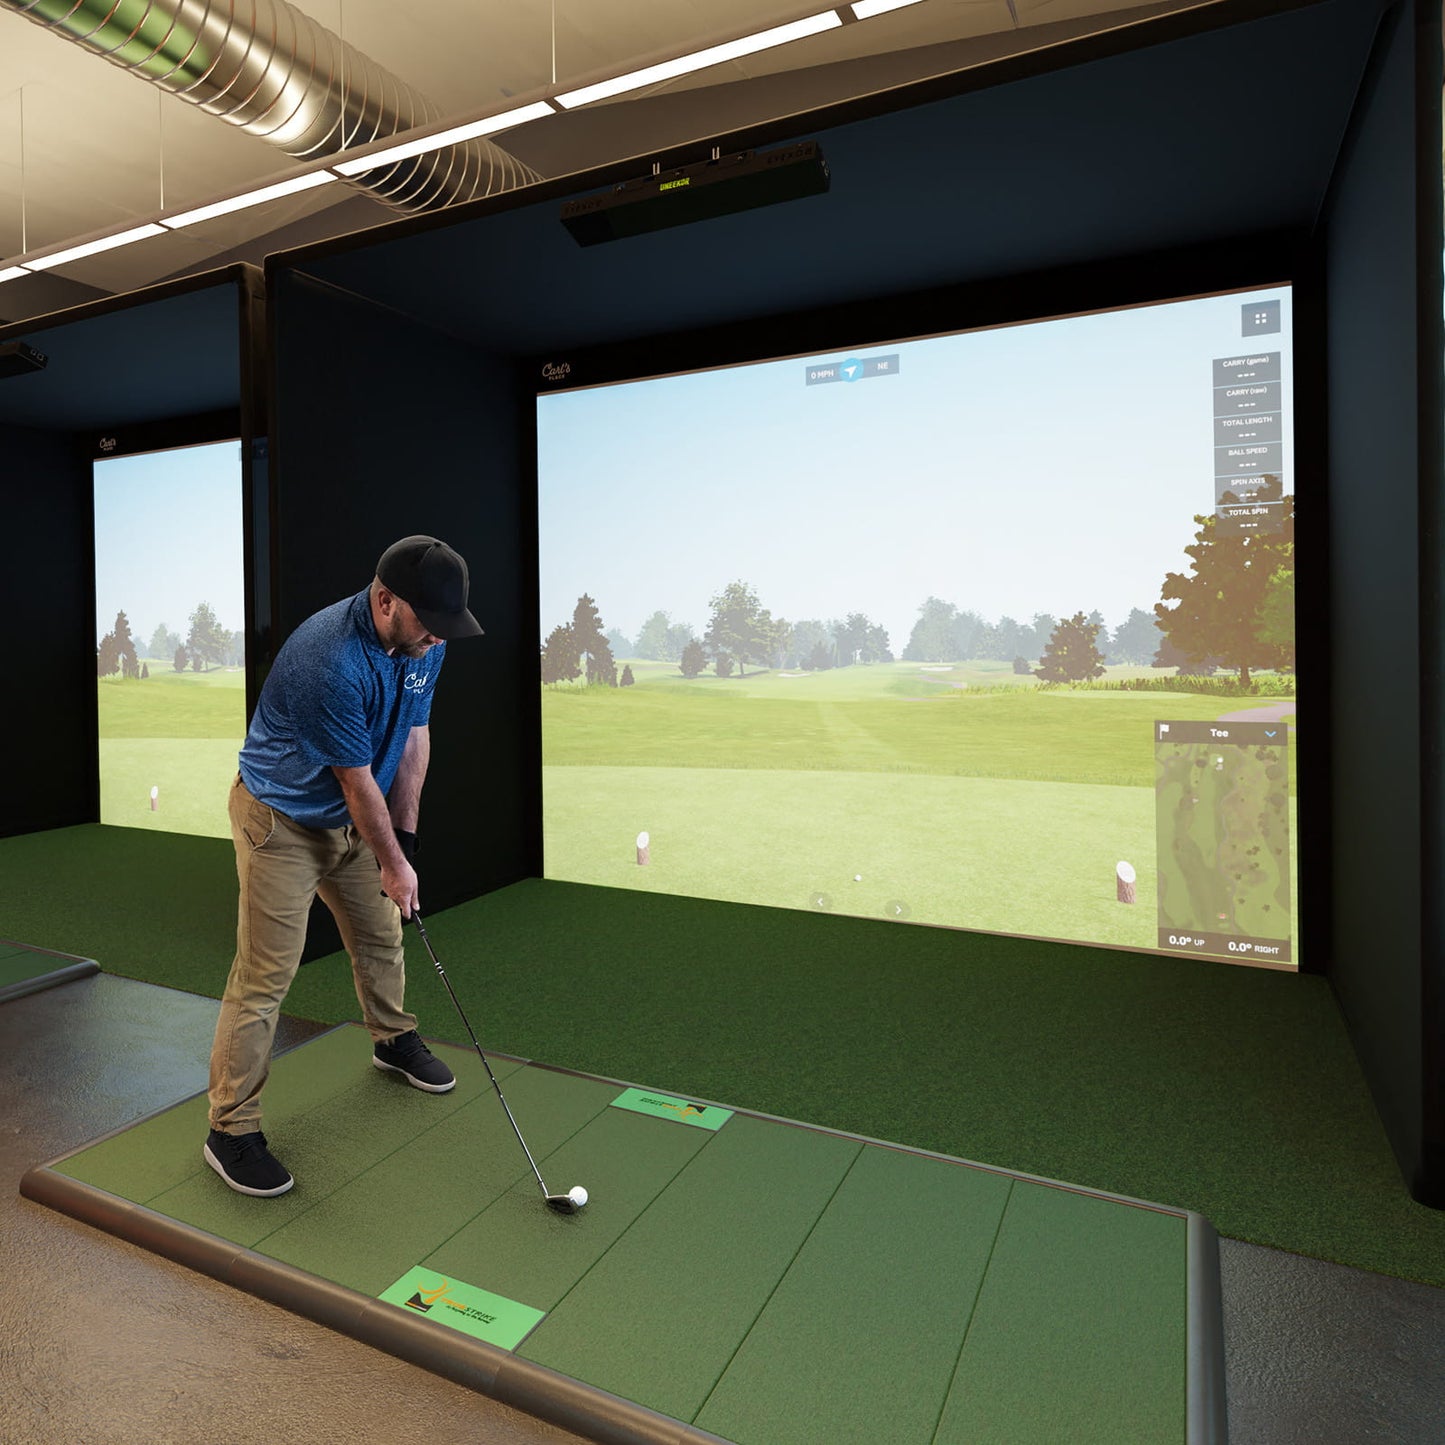


🏌️ Built for Golfers Who Expect the Best
Whether you’re a scratch player or just love teeing it up at home, the Carl’s Pro Golf Enclosure Kit delivers the ideal mix of rugged durability and premium design.
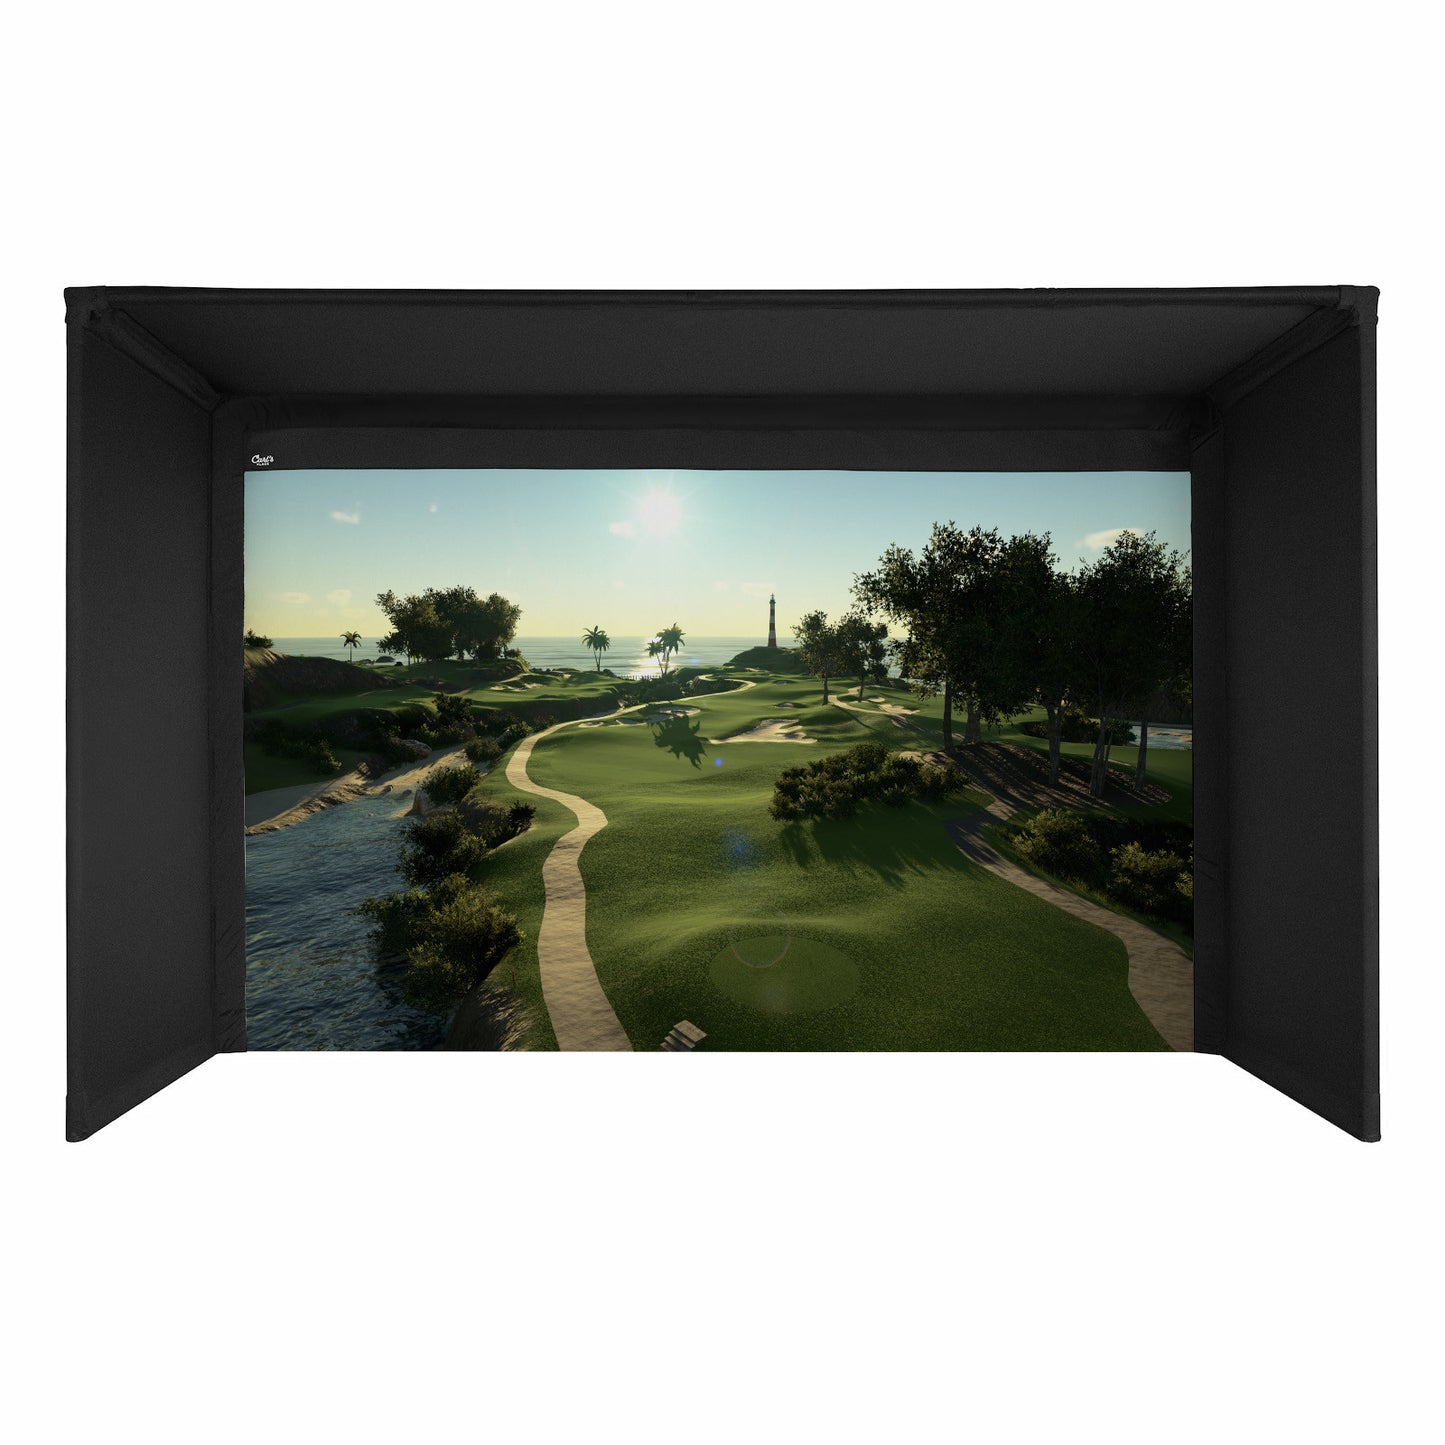
🎥 Immersive Visuals, Even in Ambient Light
Upgrade to the High-Contrast Gray Premium Golf Screen for sharper detail, richer blacks, and more lifelike visuals — perfect for setups where ambient lighting might affect picture quality.
🏗️ Designed for Upscale Golf Simulator Installations
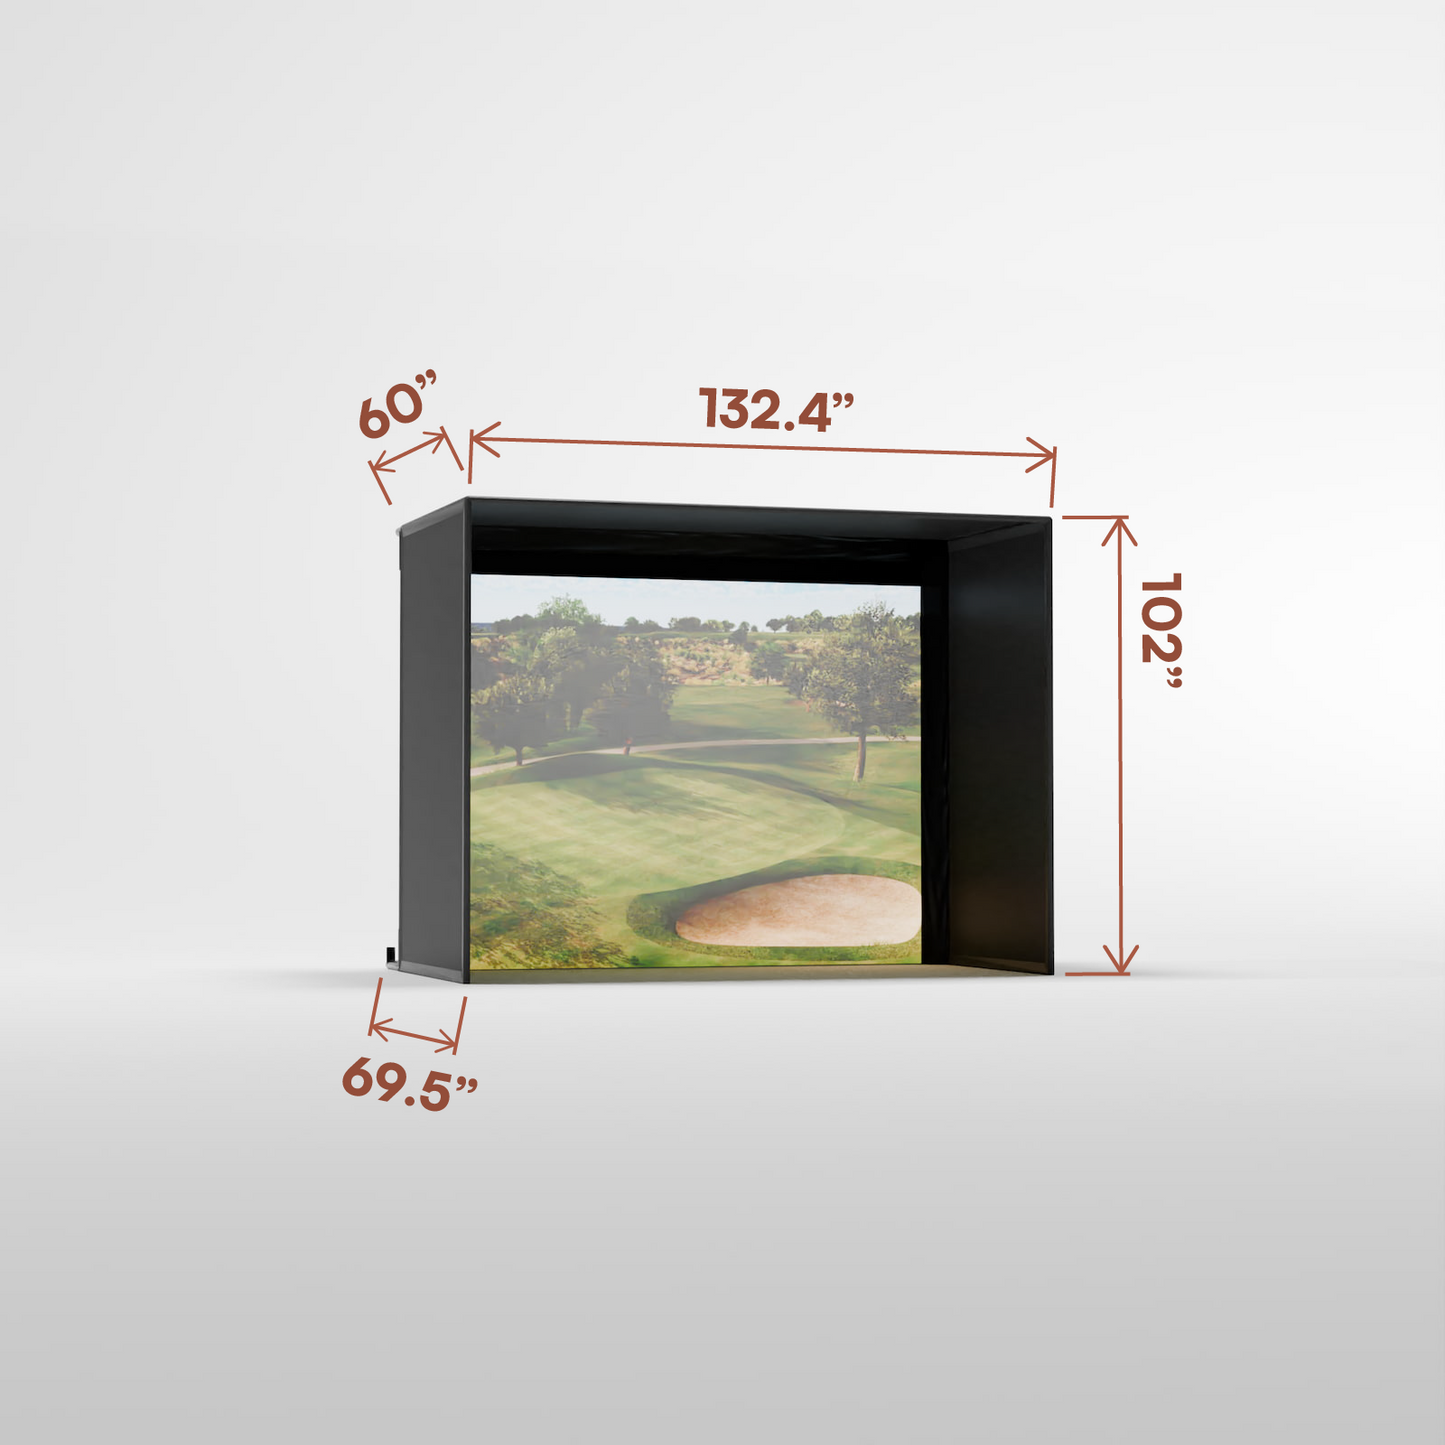
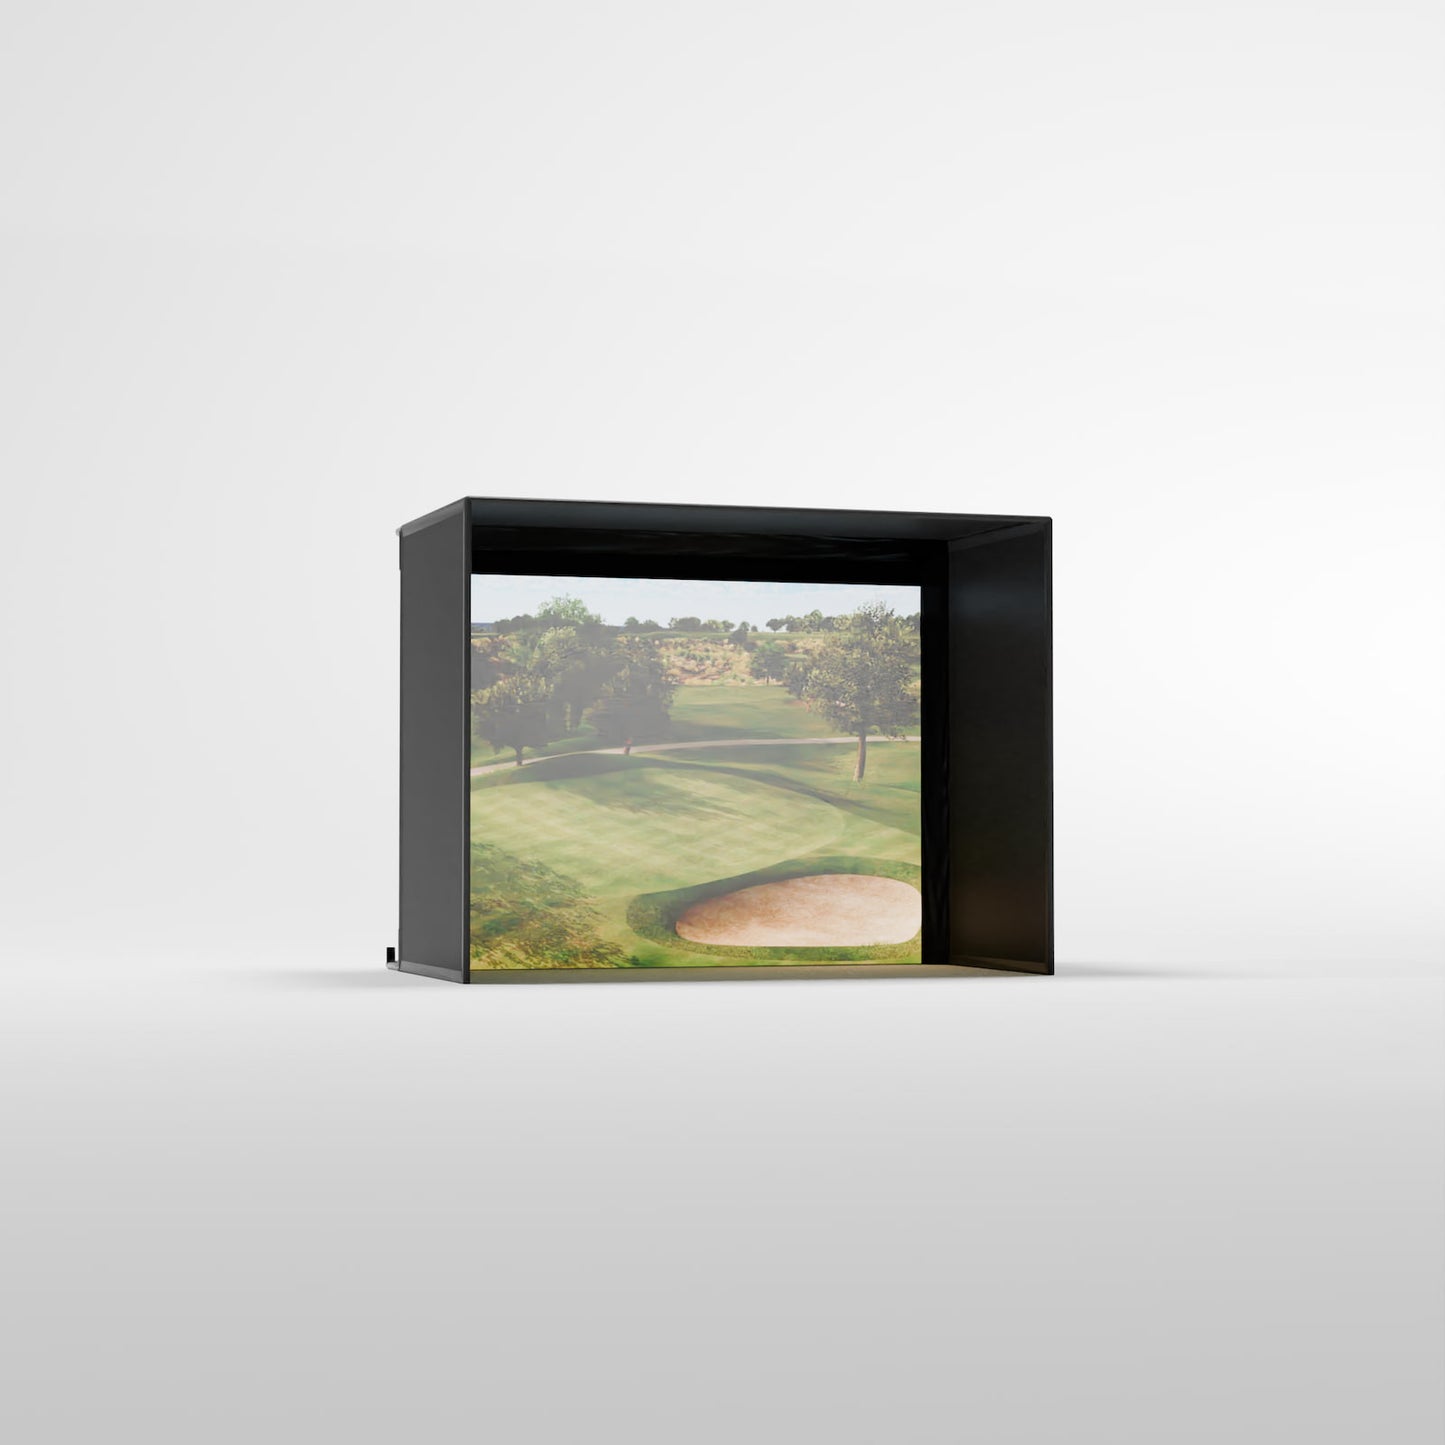
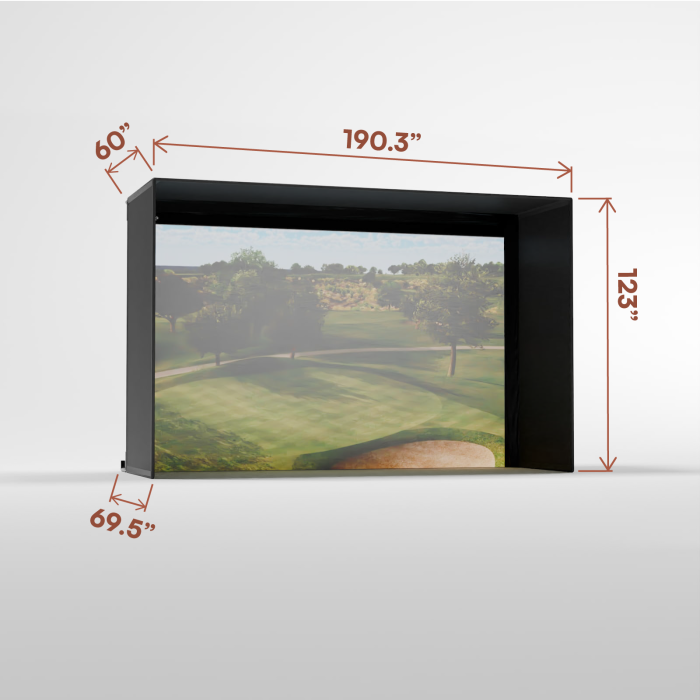
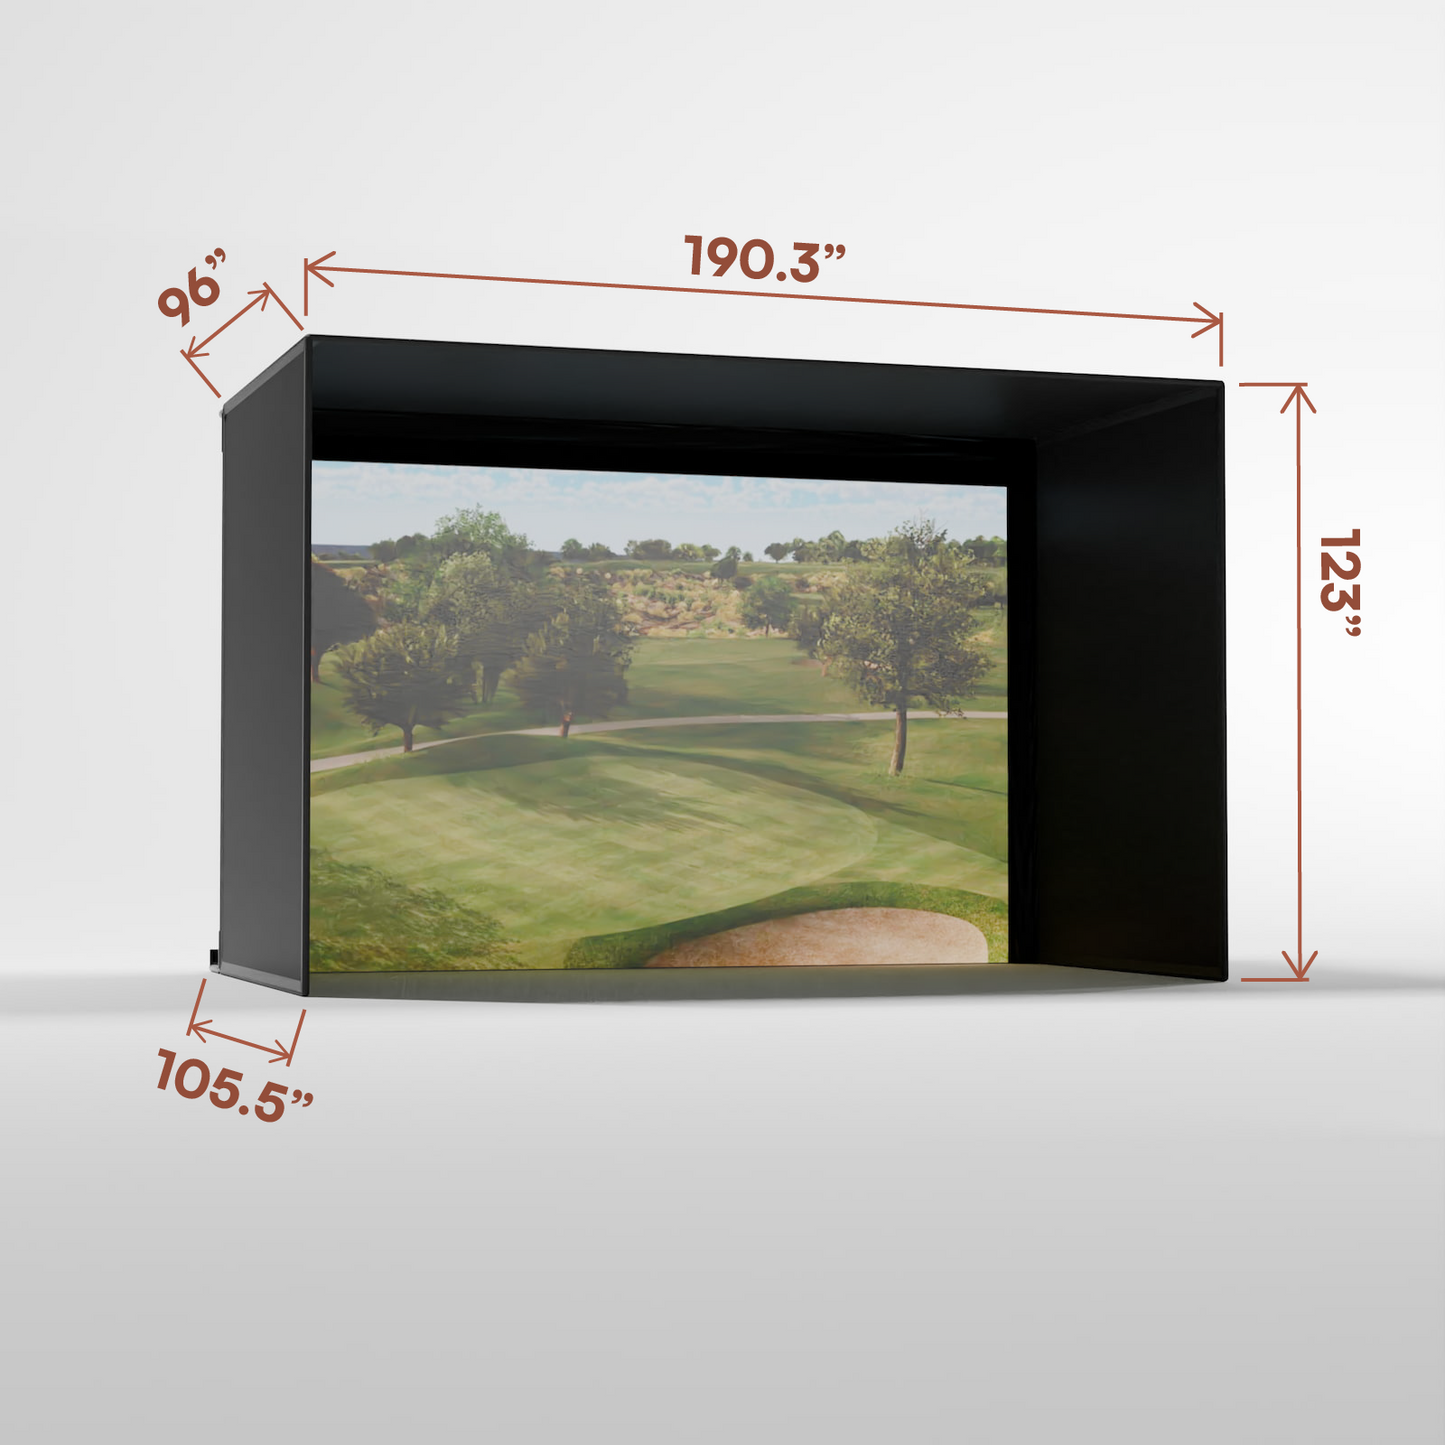
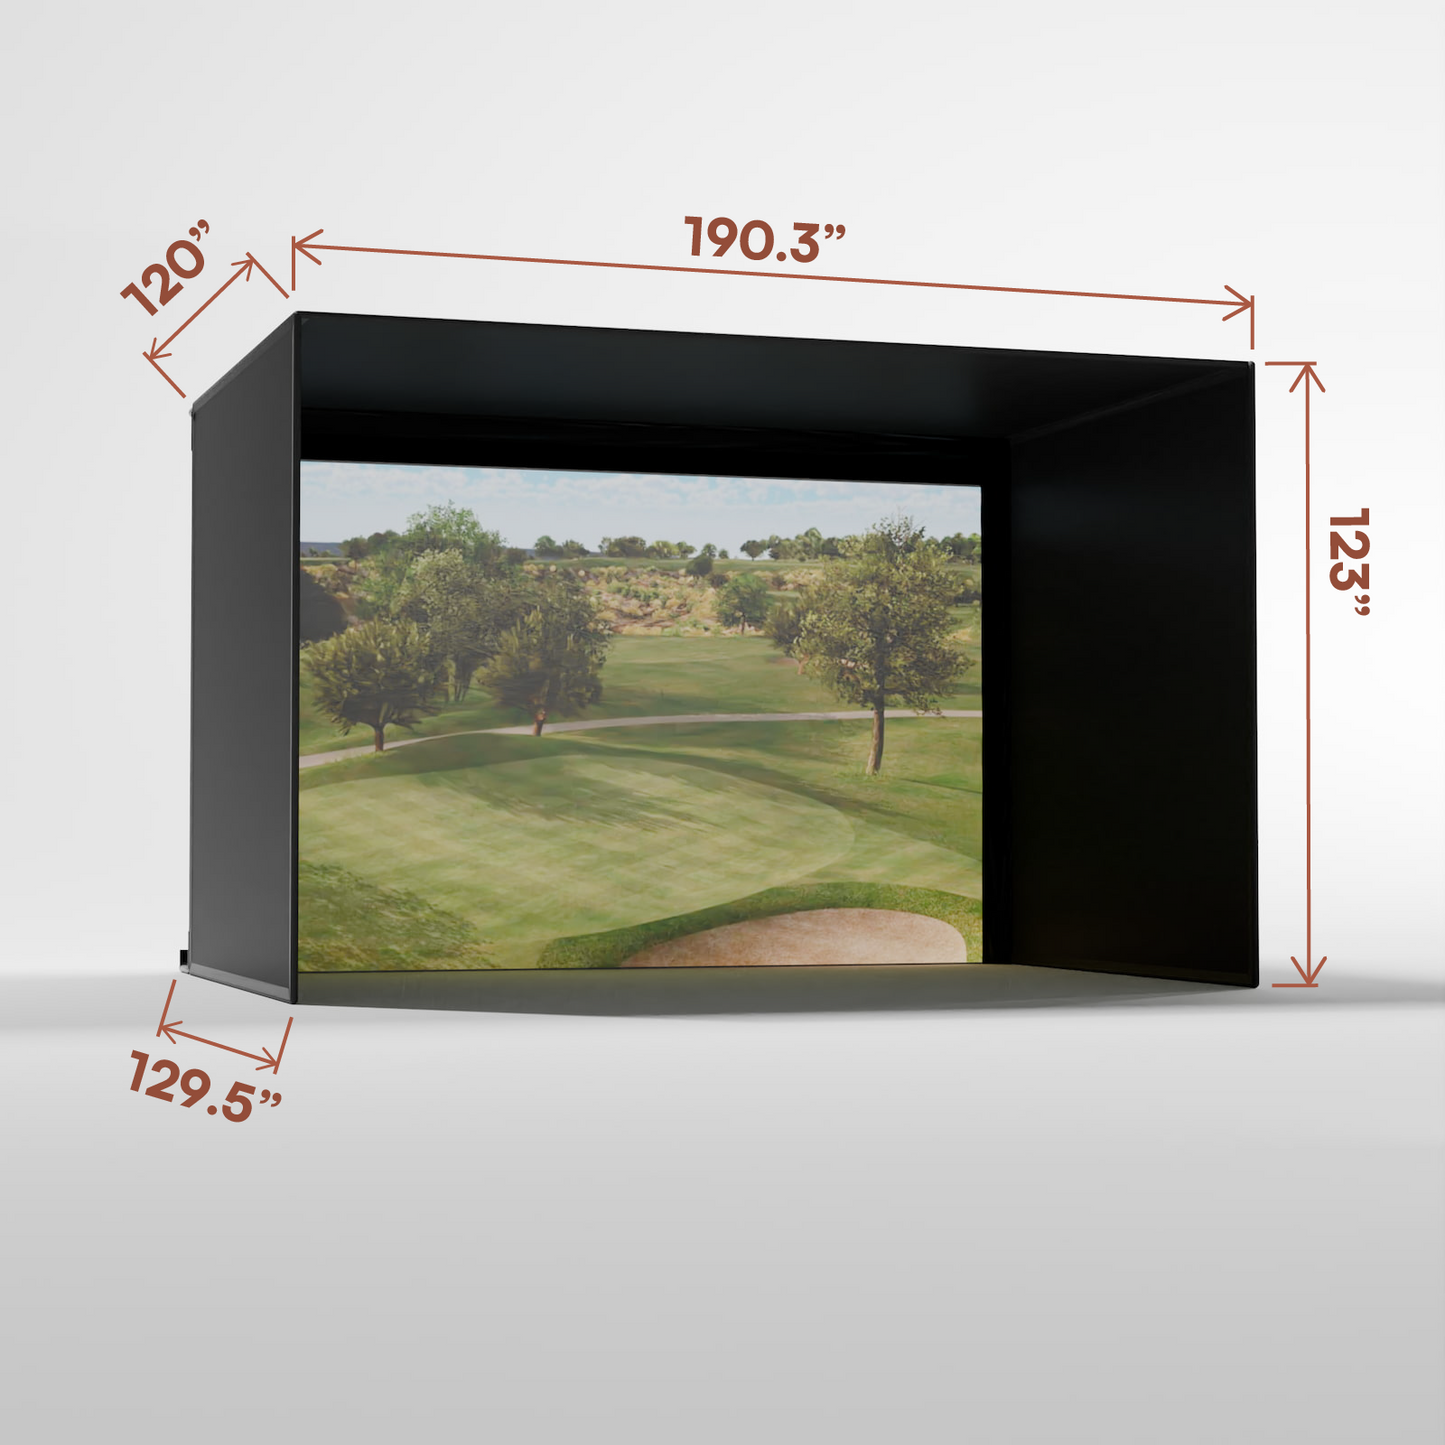
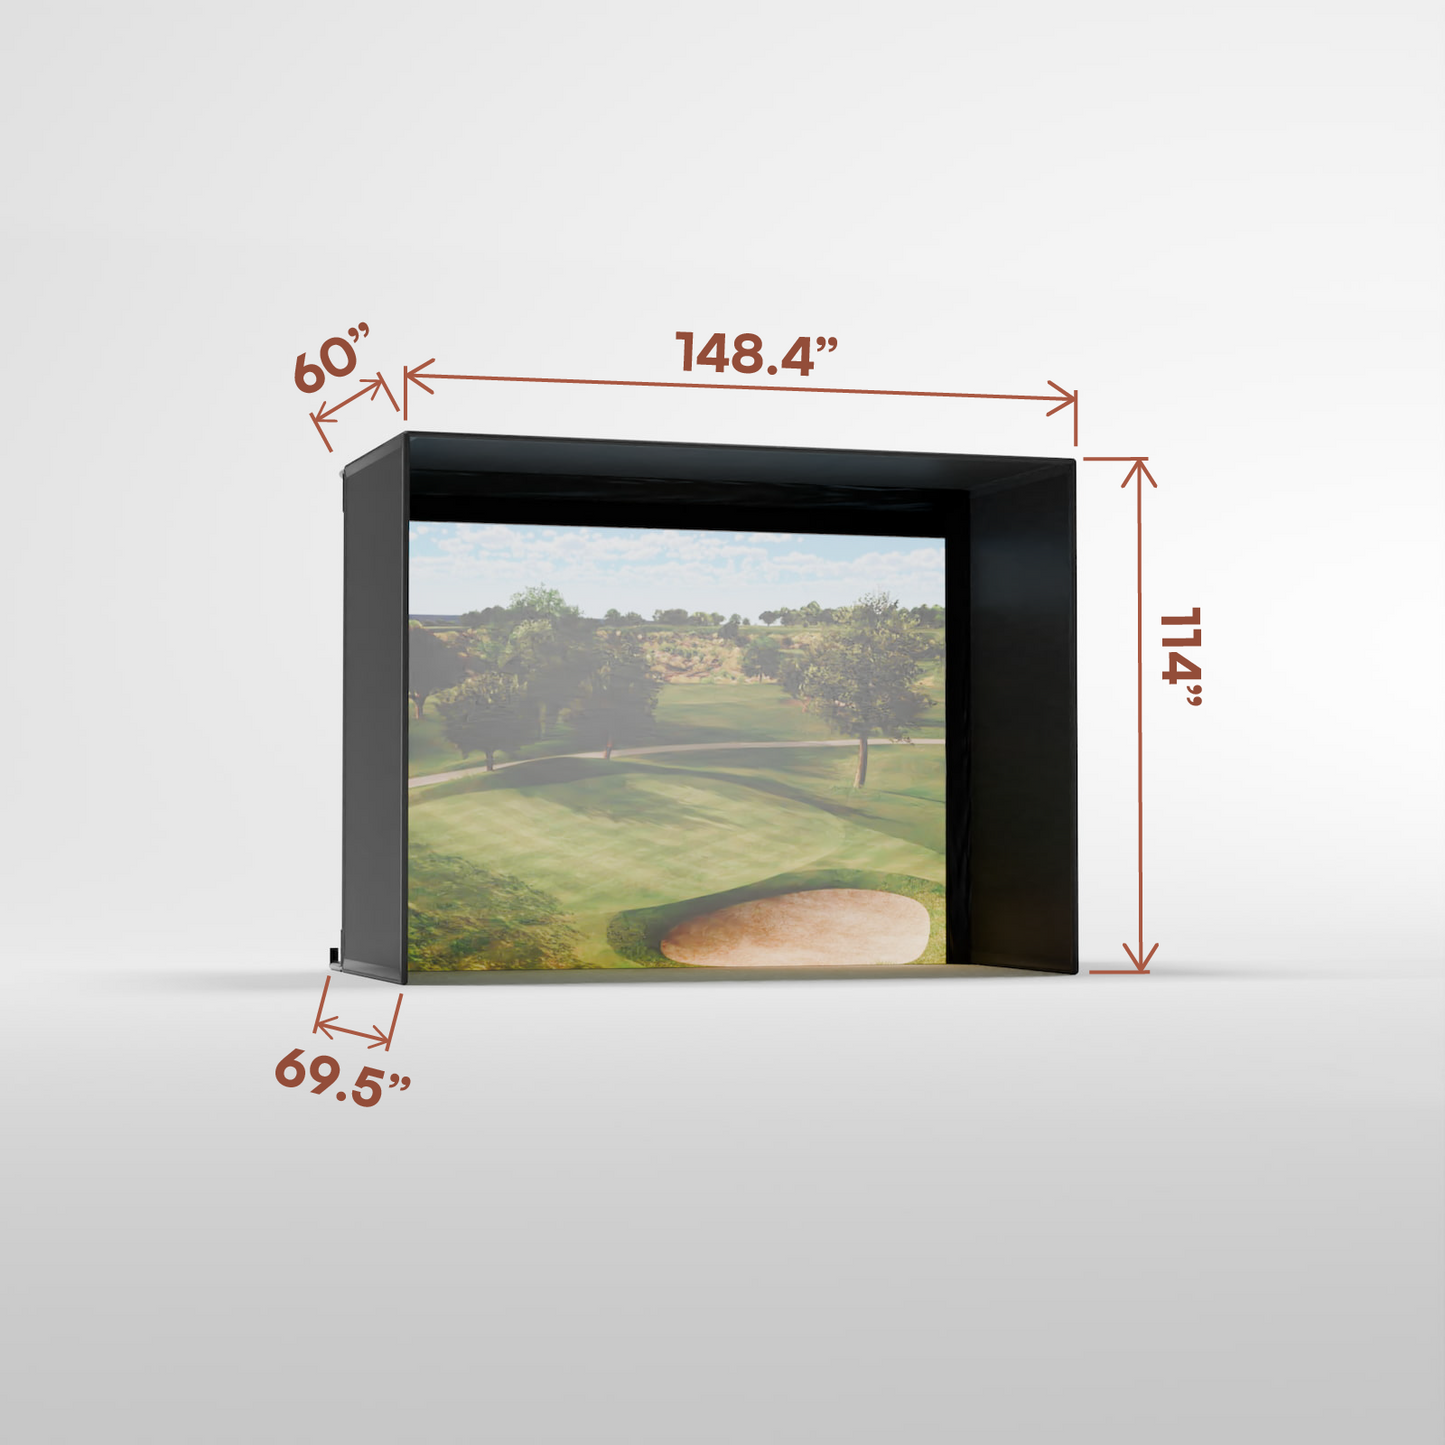
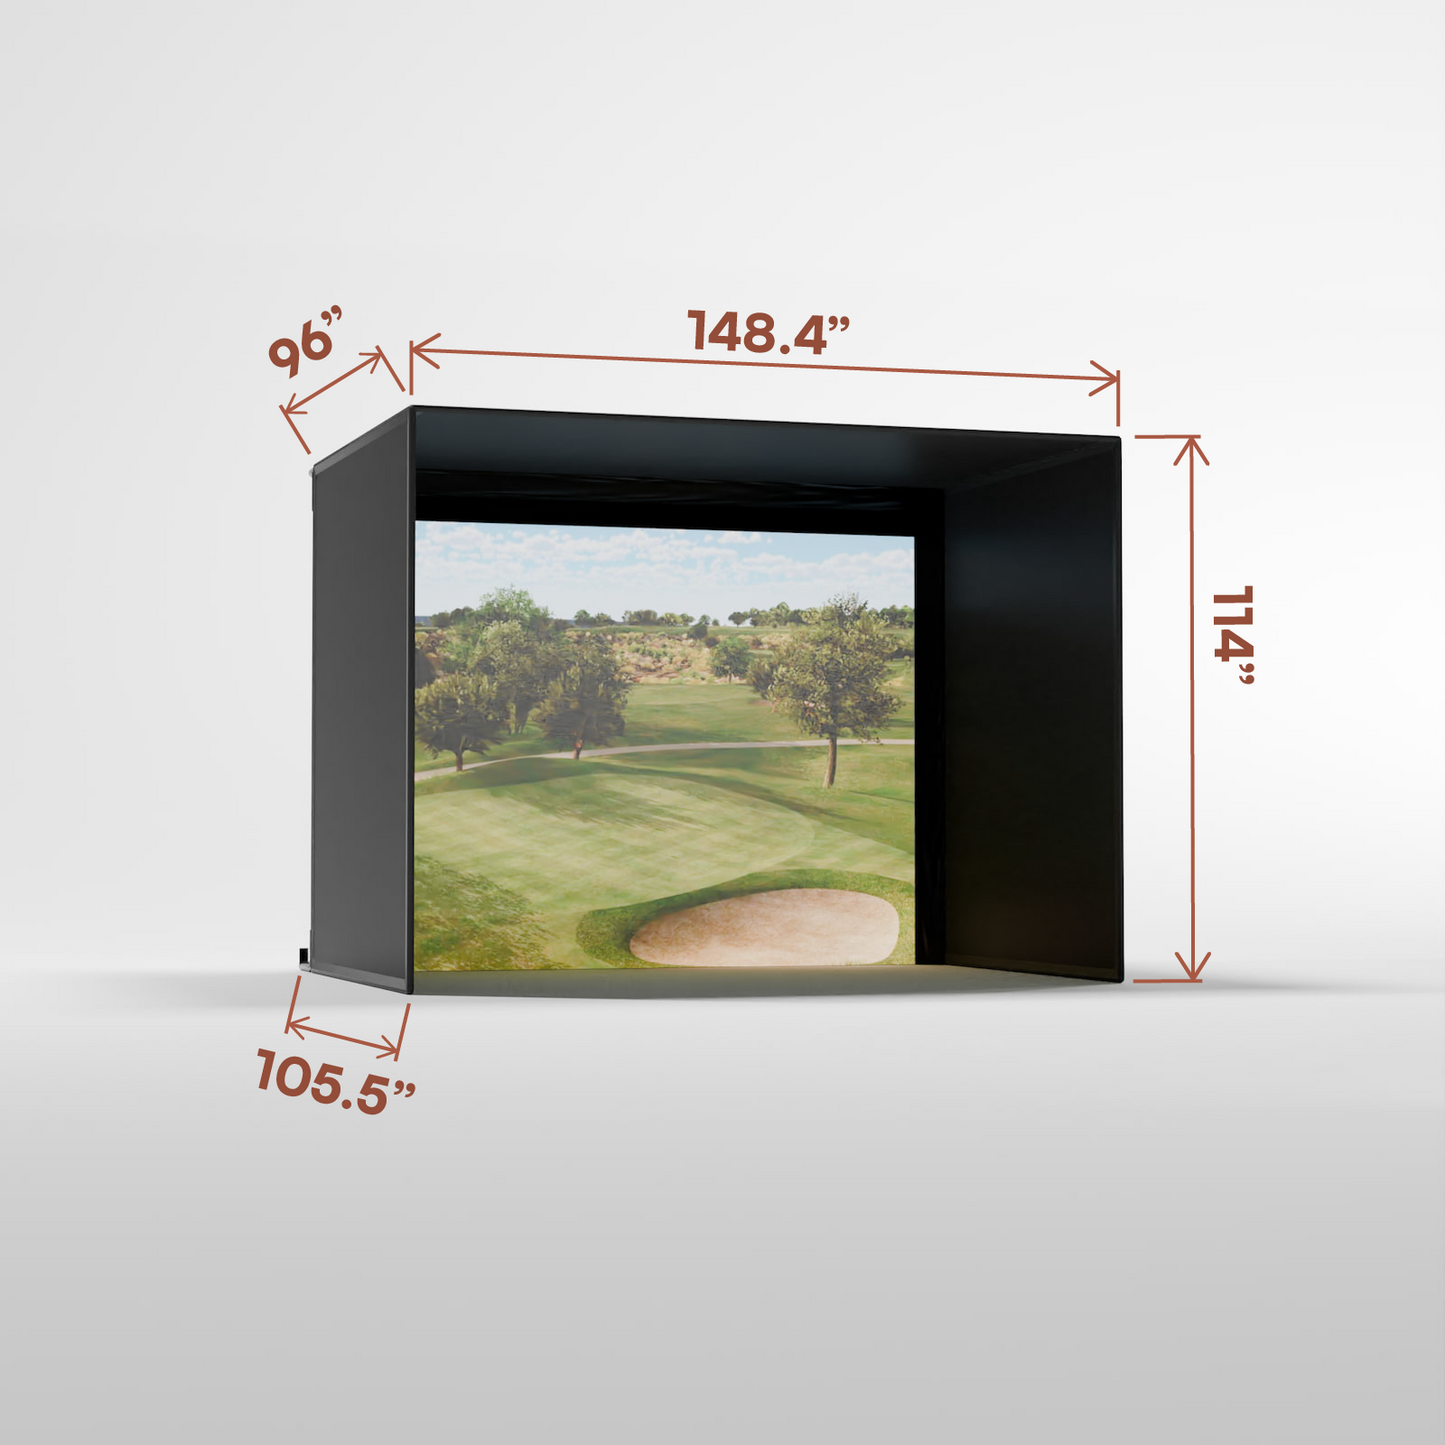
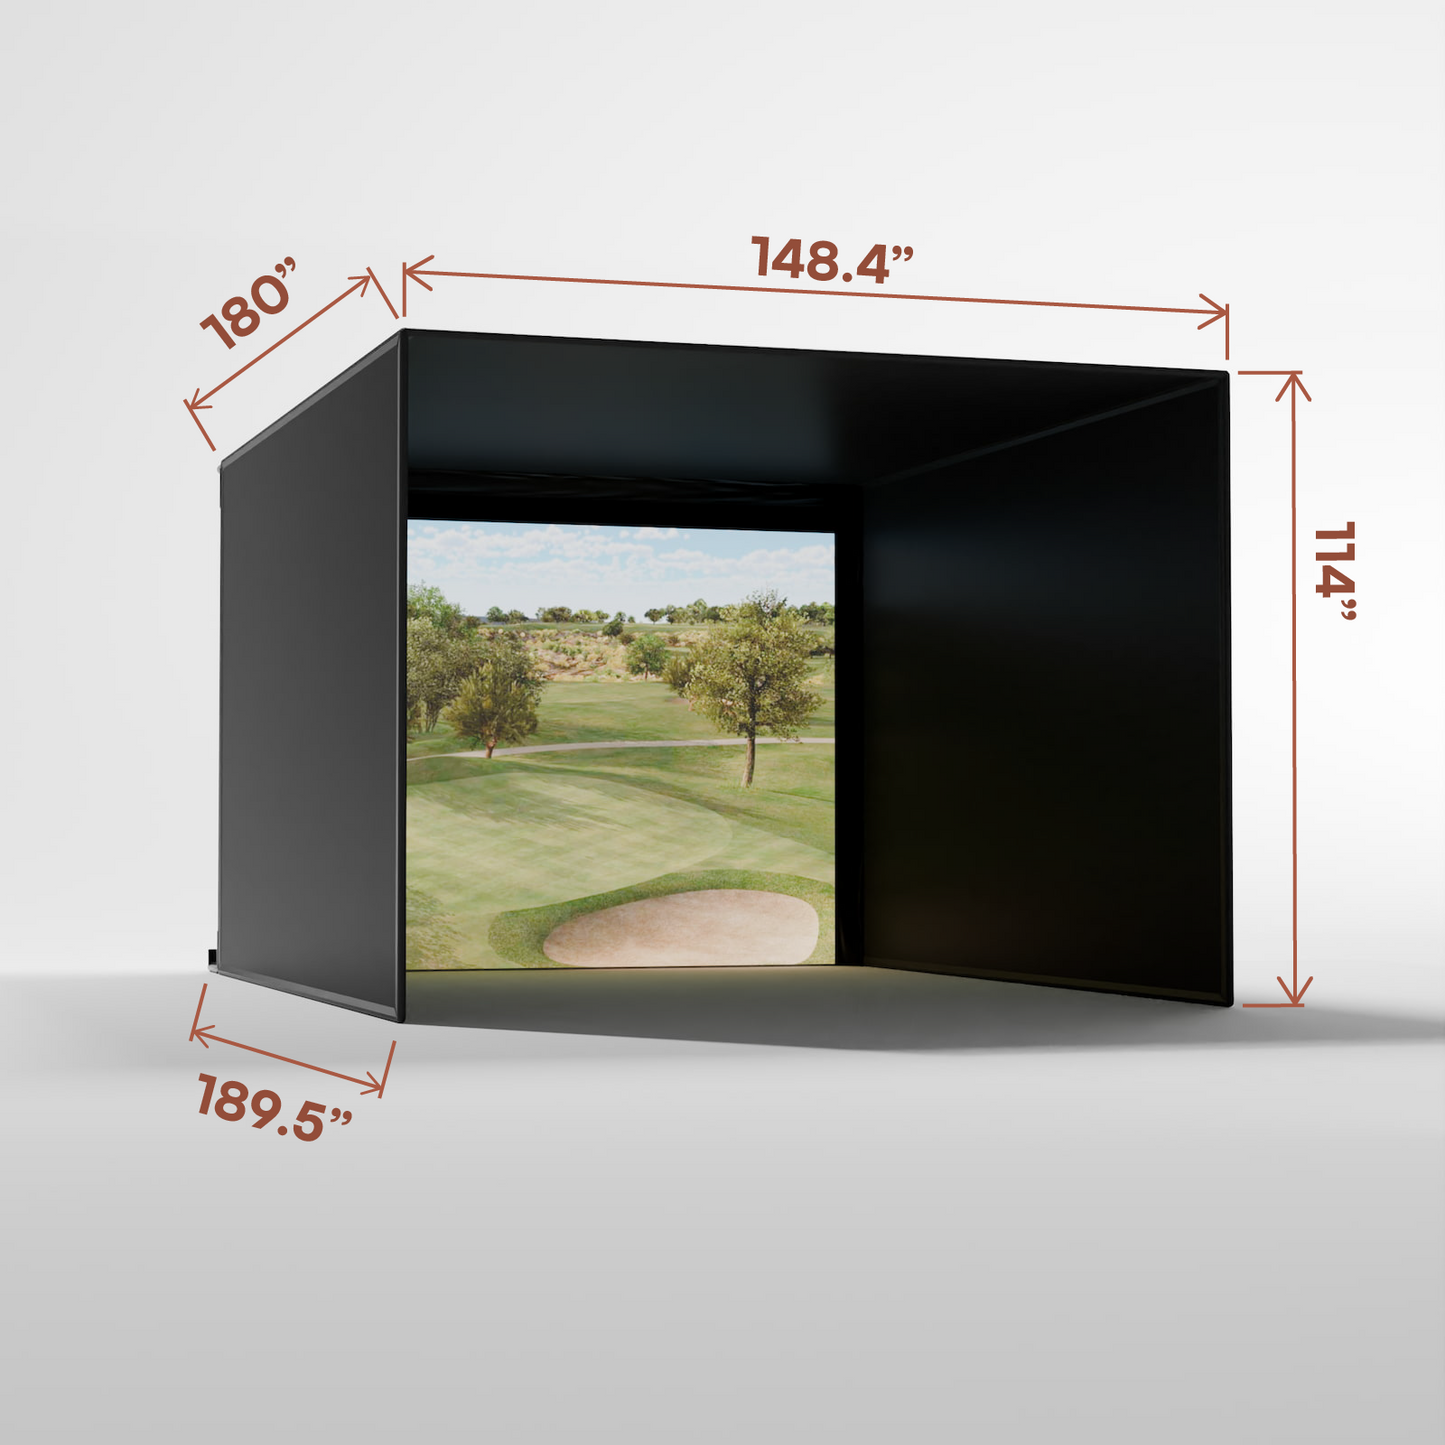
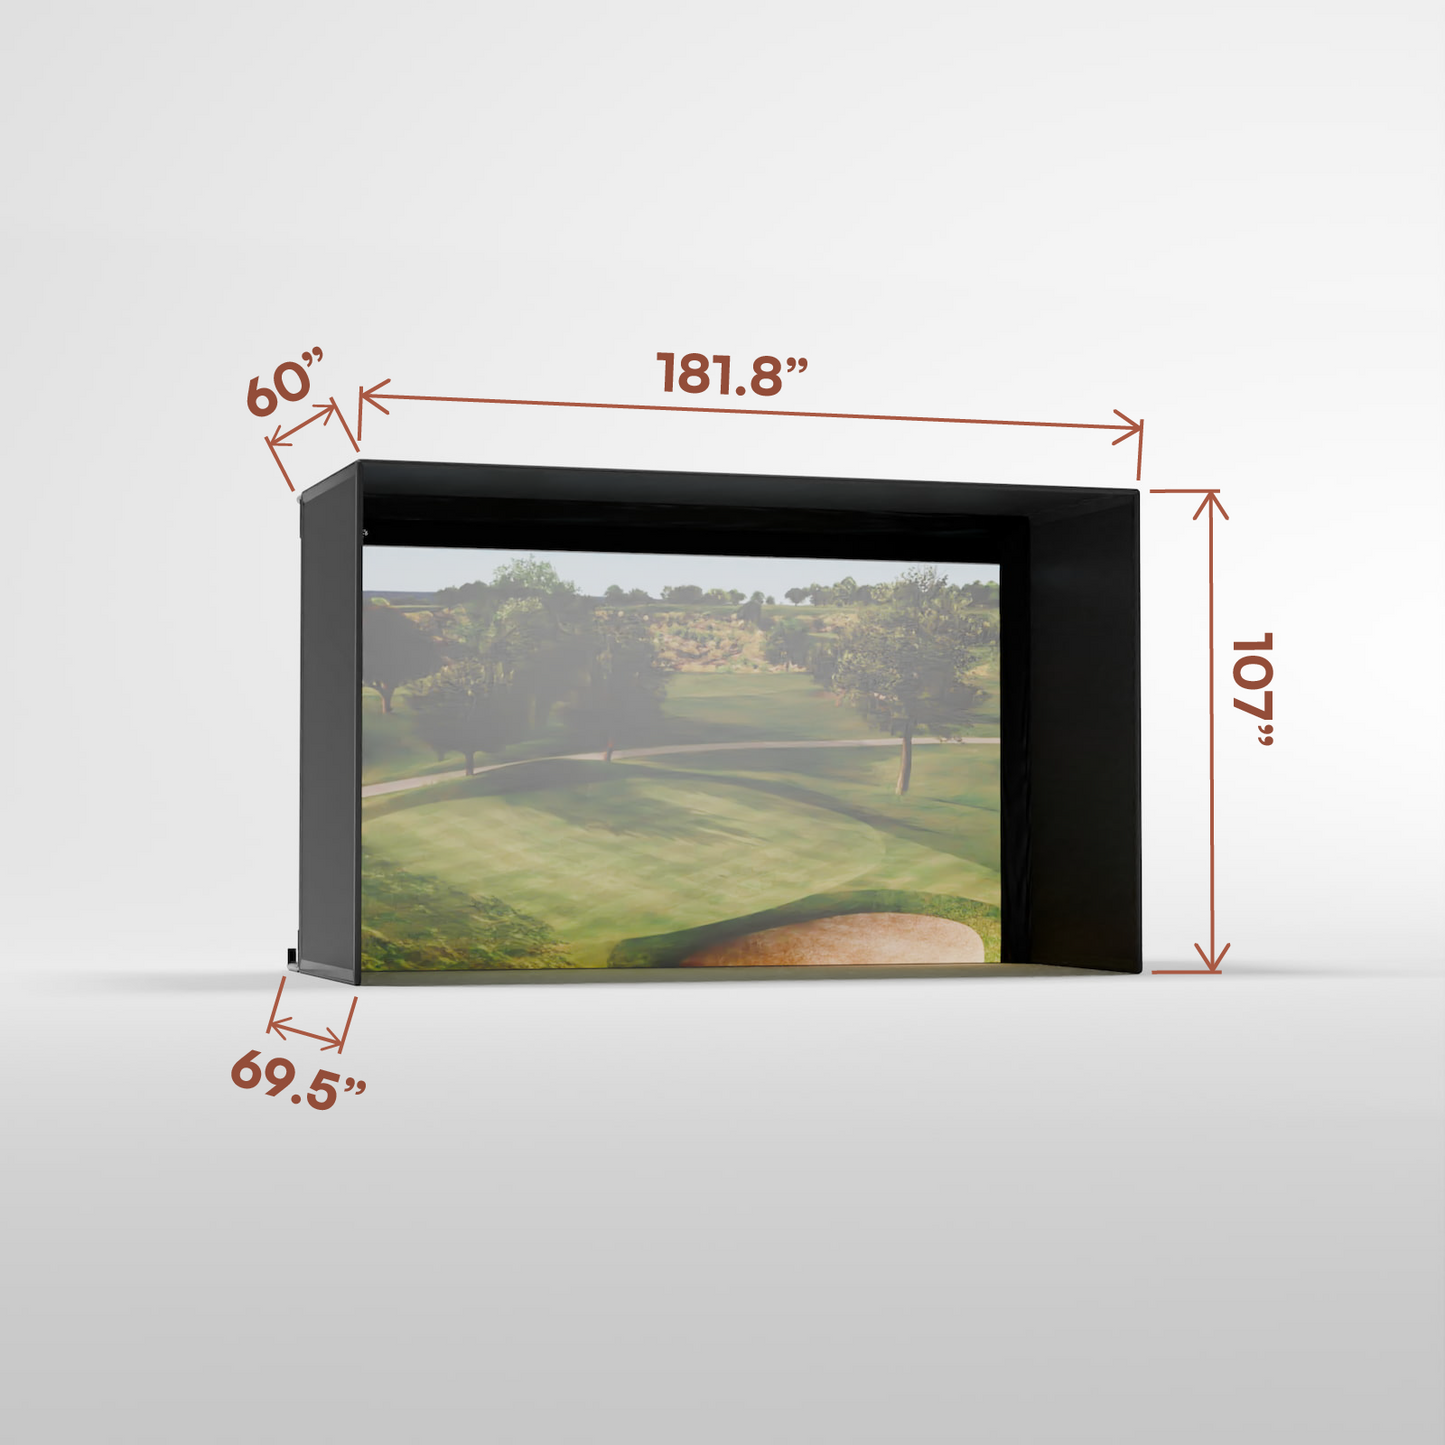
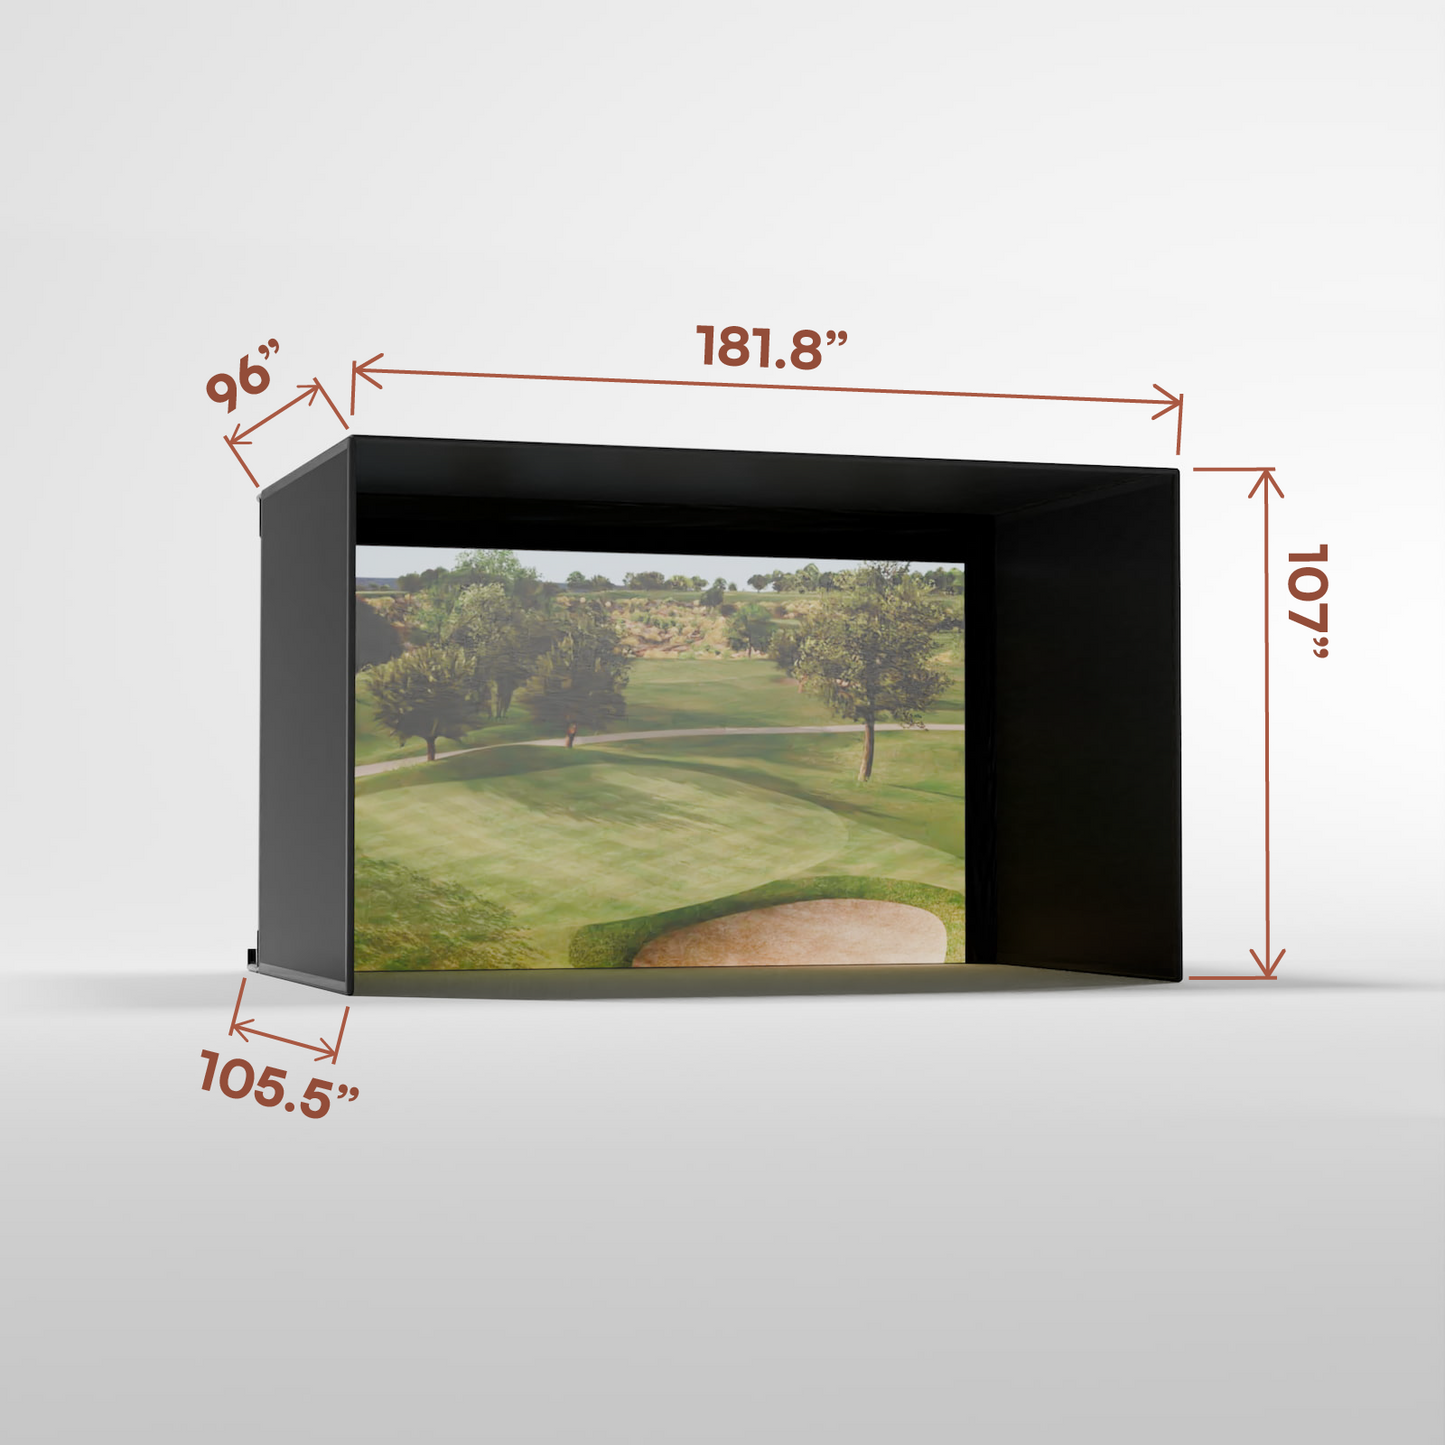
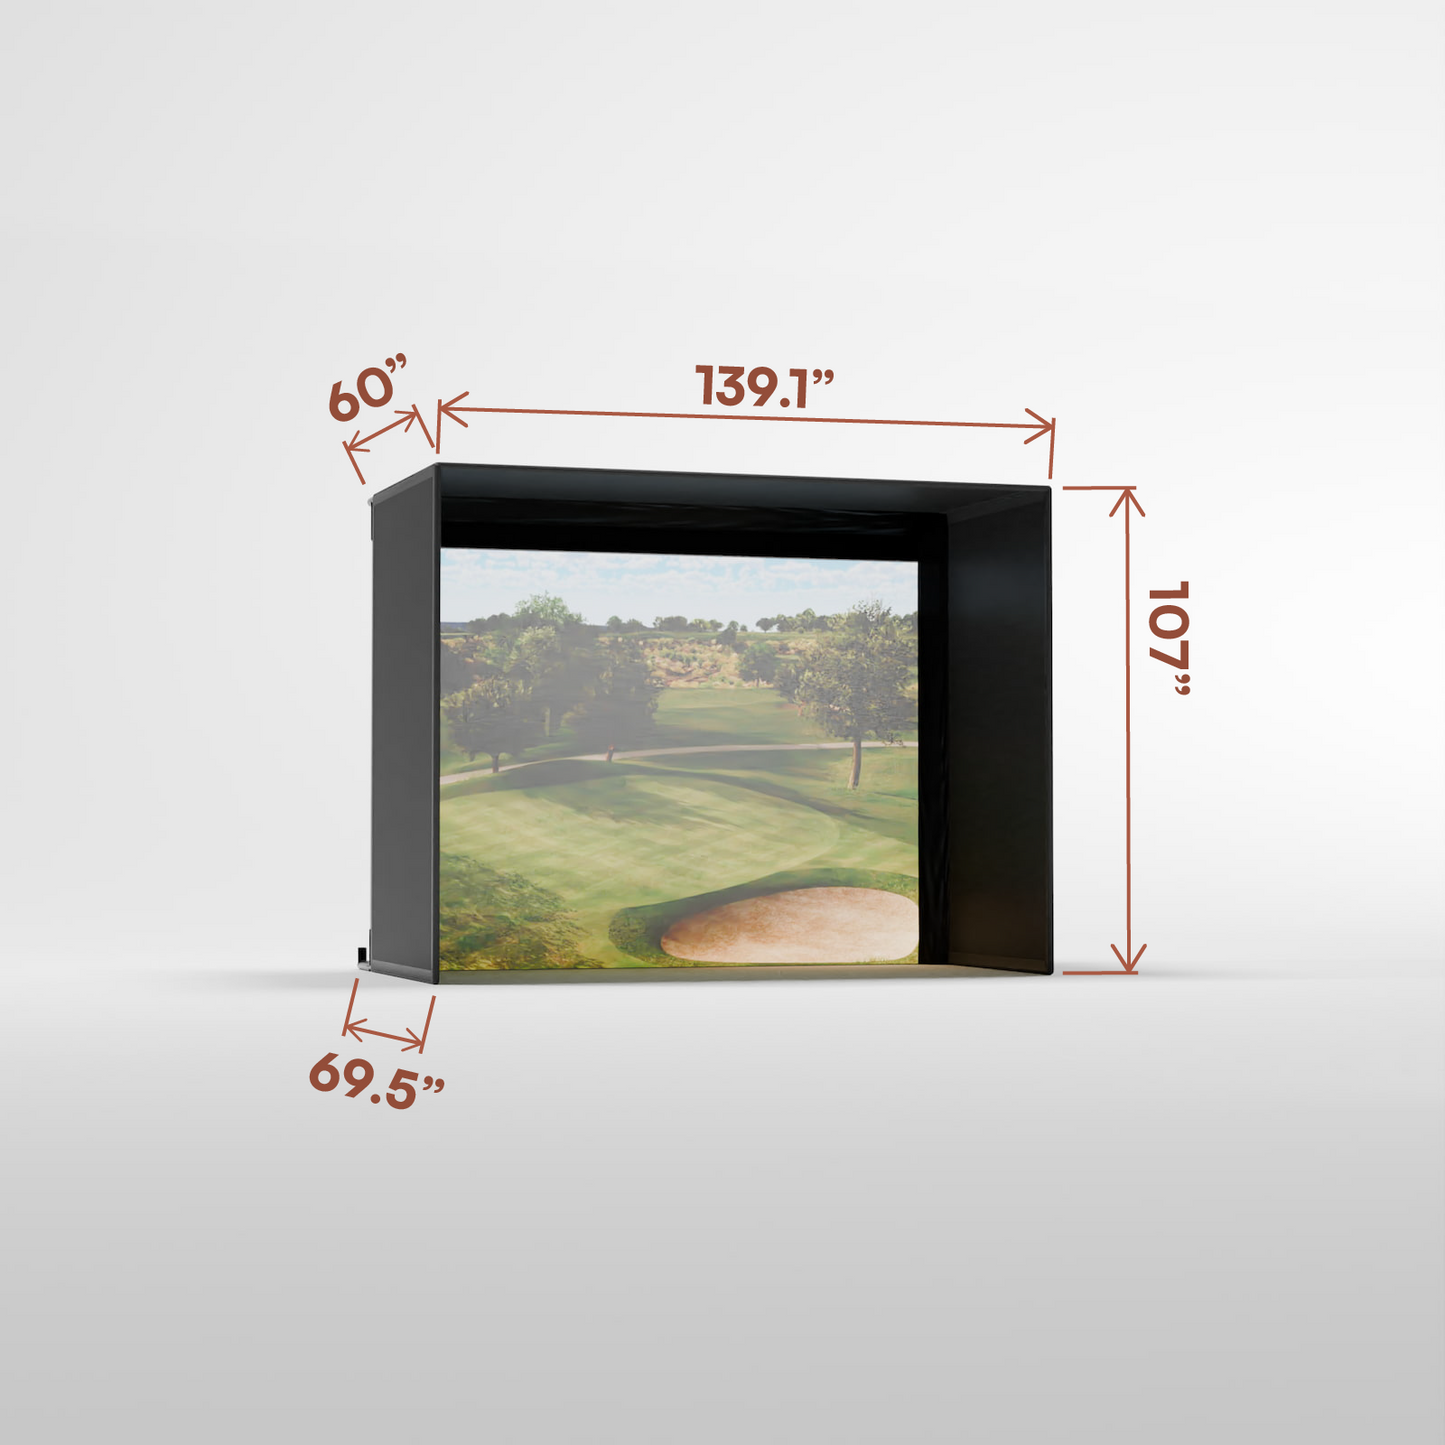
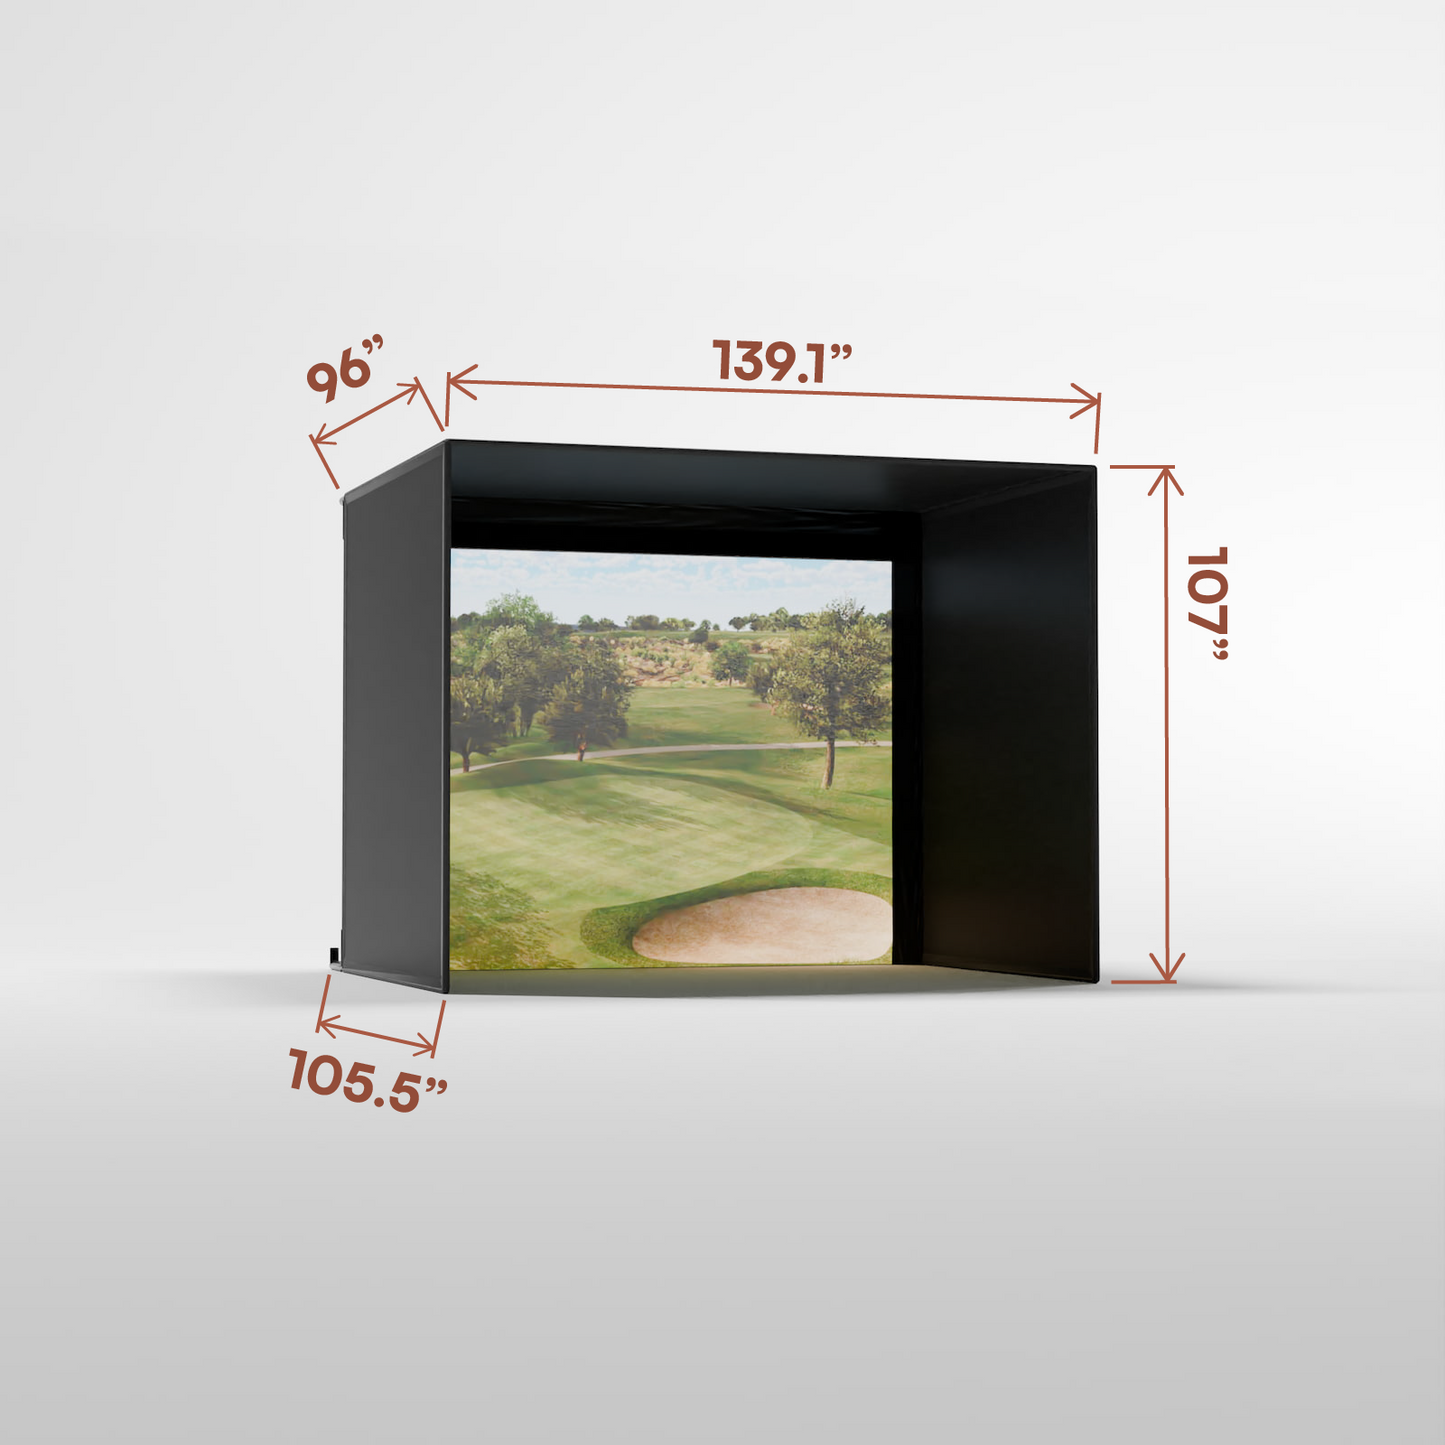
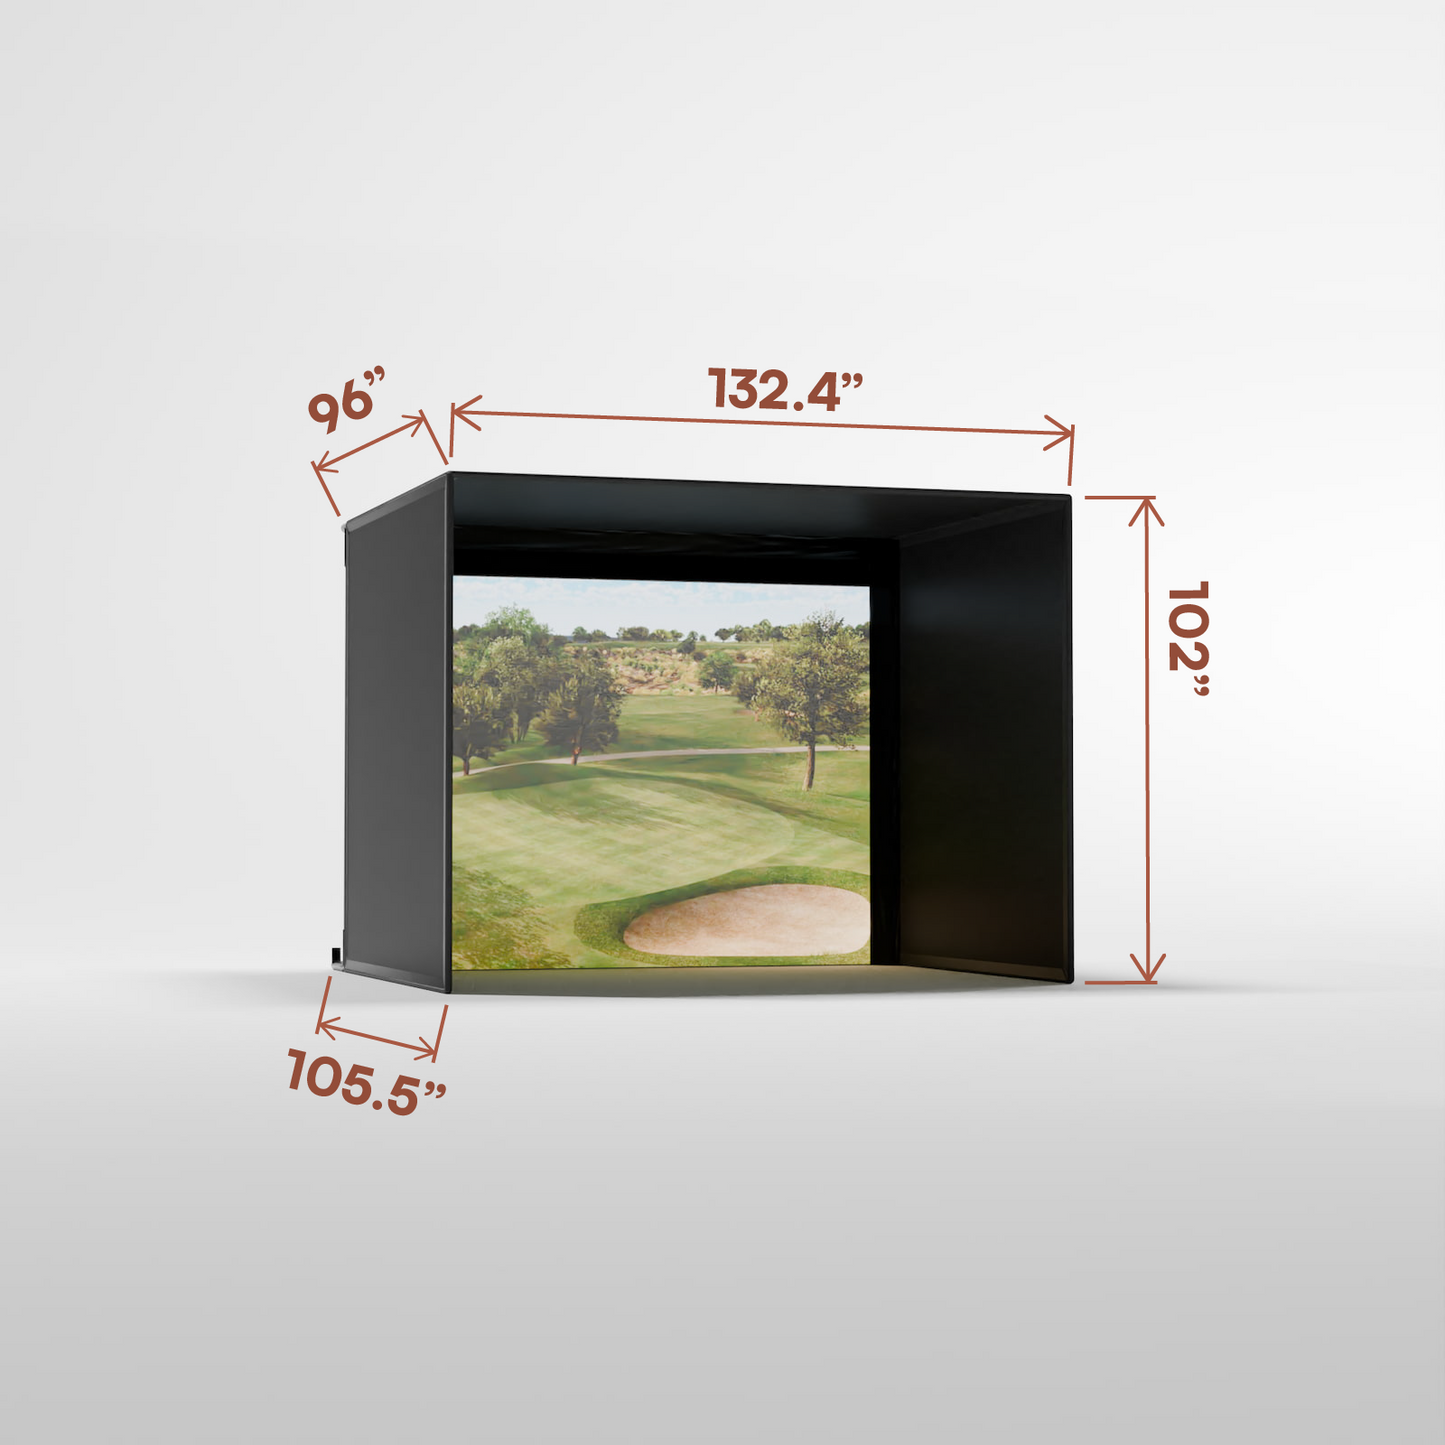
The Carl’s Pro Golf Enclosure Kit is built for large, premium setups. Perfect for commercial golf simulators, golf instruction facilities, and luxury homes, these enclosures allow your turf to flow seamlessly into a triple-layer impact screen. With no bottom border, you’ll enjoy the most immersive golf simulator visuals possible.
⚙️ Standard Features
-
Black knit fabric enclosure
-
Connector fittings for 2" EMT pipes (pipes sold separately)
-
Premium golf impact screen
Whether you choose a full-featured setup or keep it simple, this enclosure transforms your indoor golf space.
🛡️ Practice Without Hazards
Say goodbye to both water hazards and safety hazards. The Pro Enclosure’s advanced screen system uses releasable zip ties and a bottom cable to minimize ball bounce-back — keeping practice safe and productive.
🧩 Easy Add-Ons for a Complete Setup
Get everything delivered in one order for a hassle-free installation. Add foam inserts for extra protection and structural pipes for a sturdy build. With quick assembly and simple integration for your electronics, you’ll be ready to tee off in no time.
⛳ Go Big or Go Home
Whether you prefer to stand inside the bay or just outside the enclosure, Carl’s Pro Enclosures offer sizes large enough to handle any commercial or high-end home golf simulator.
Details
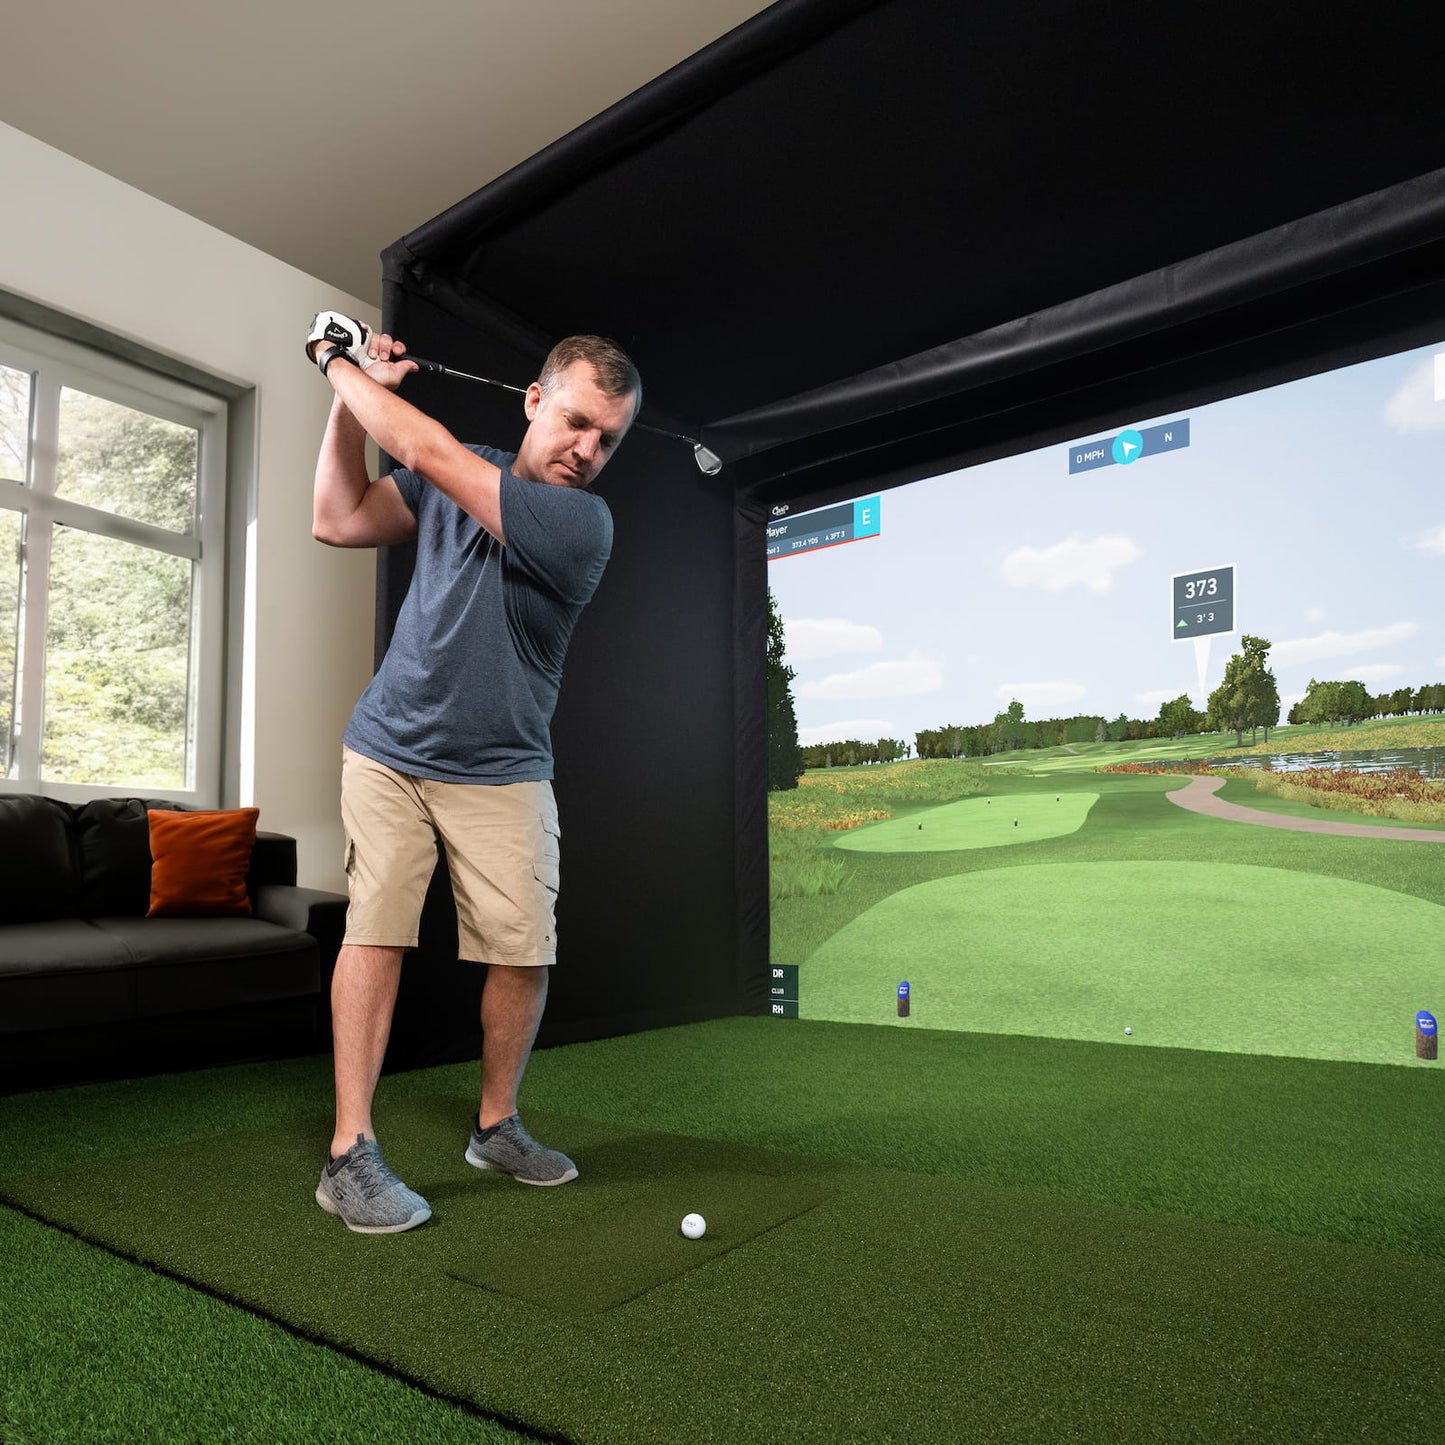
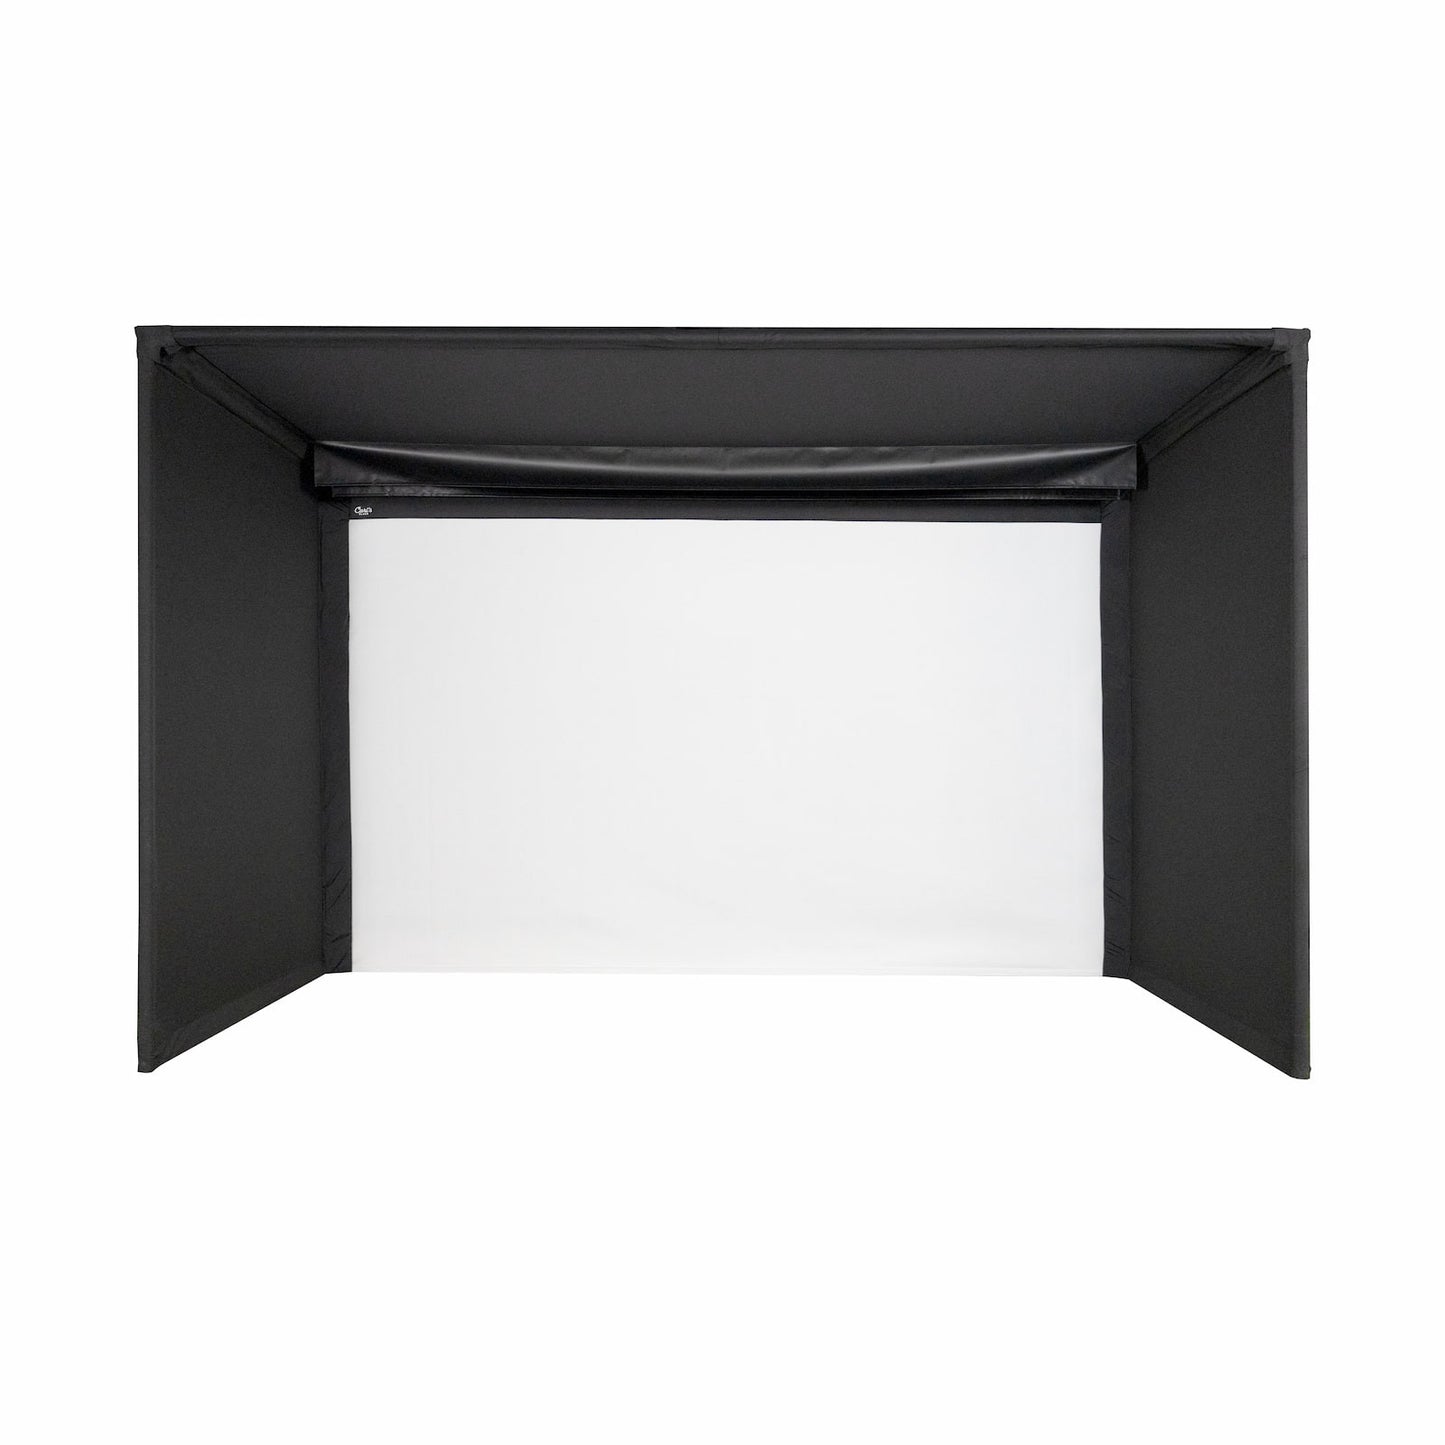
🏌️ Premium Quality, Professional Design
Built from top-tier materials, the Carl’s Pro Golf Enclosure is the choice for upscale home simulators and commercial installations. With hand-sewn screens and deep bays, these enclosures are both rugged and refined — transforming your space into a truly realistic golf environment.
📦 What’s Included in the Pro Golf Simulator Enclosure
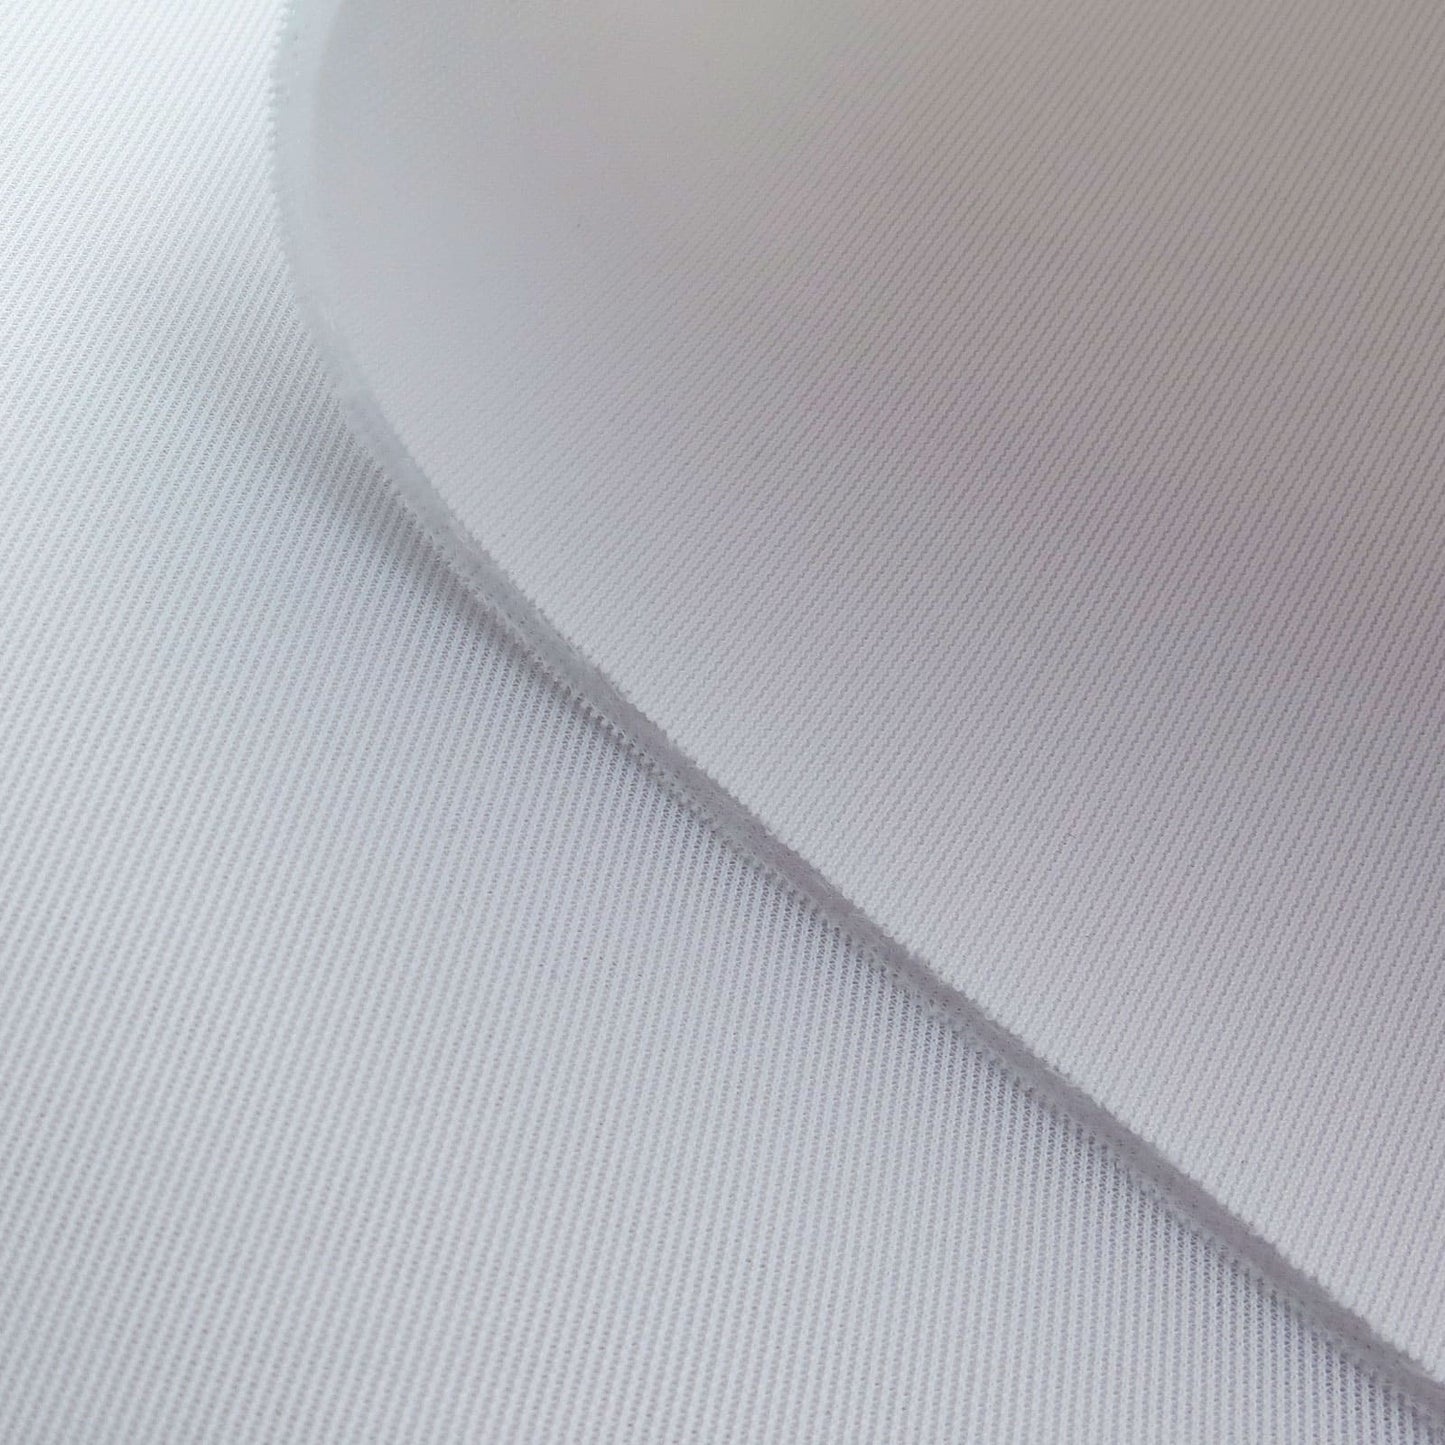
🎥 Premium Golf Impact Screen
Crafted with three layers of heavy-duty, tight-knit polyester, this hitting screen features the smoothest surface available for full-impact material. The ultra-dense weave dramatically enhances image clarity and realism.
-
Cabled design allows the image to extend seamlessly to the turf
-
Gray Screen Option: Choose the High-Contrast Gray Premium Screen for setups with ambient light — delivering deep blacks and vivid colors
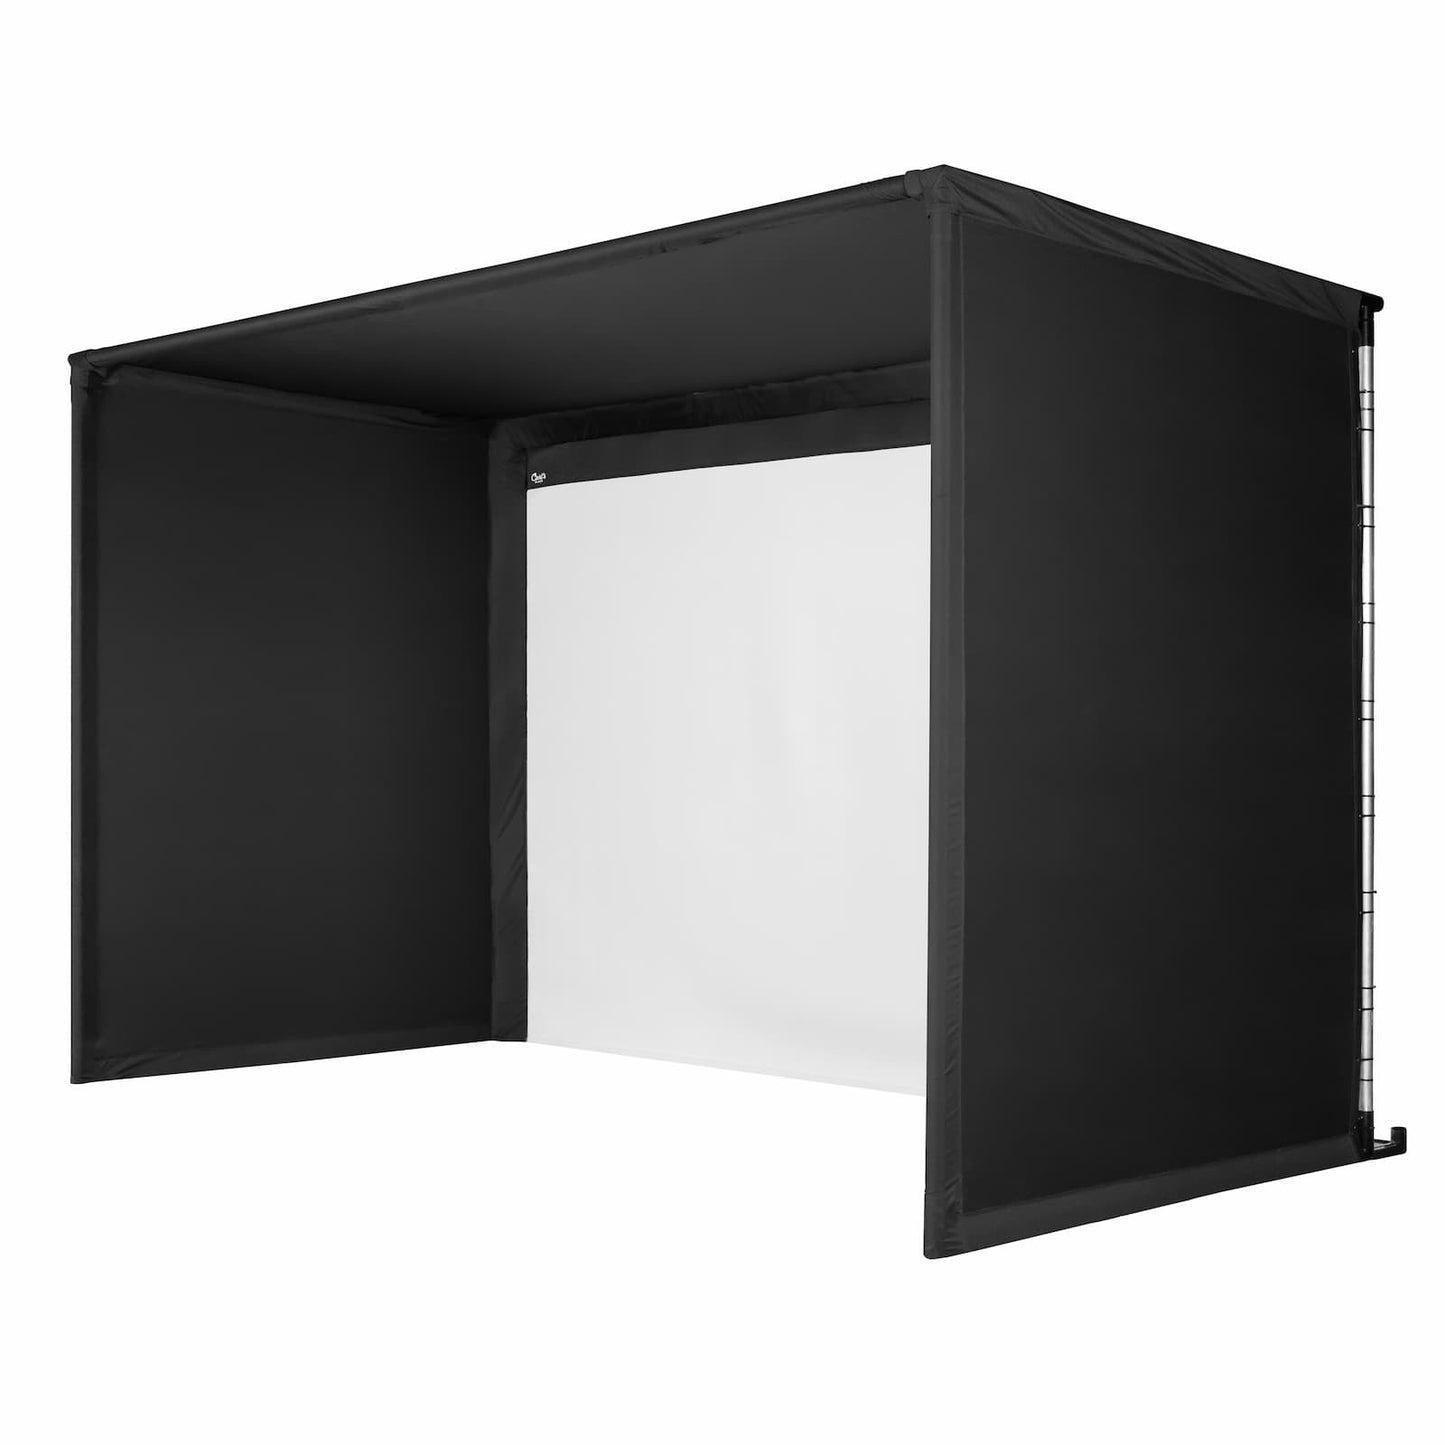
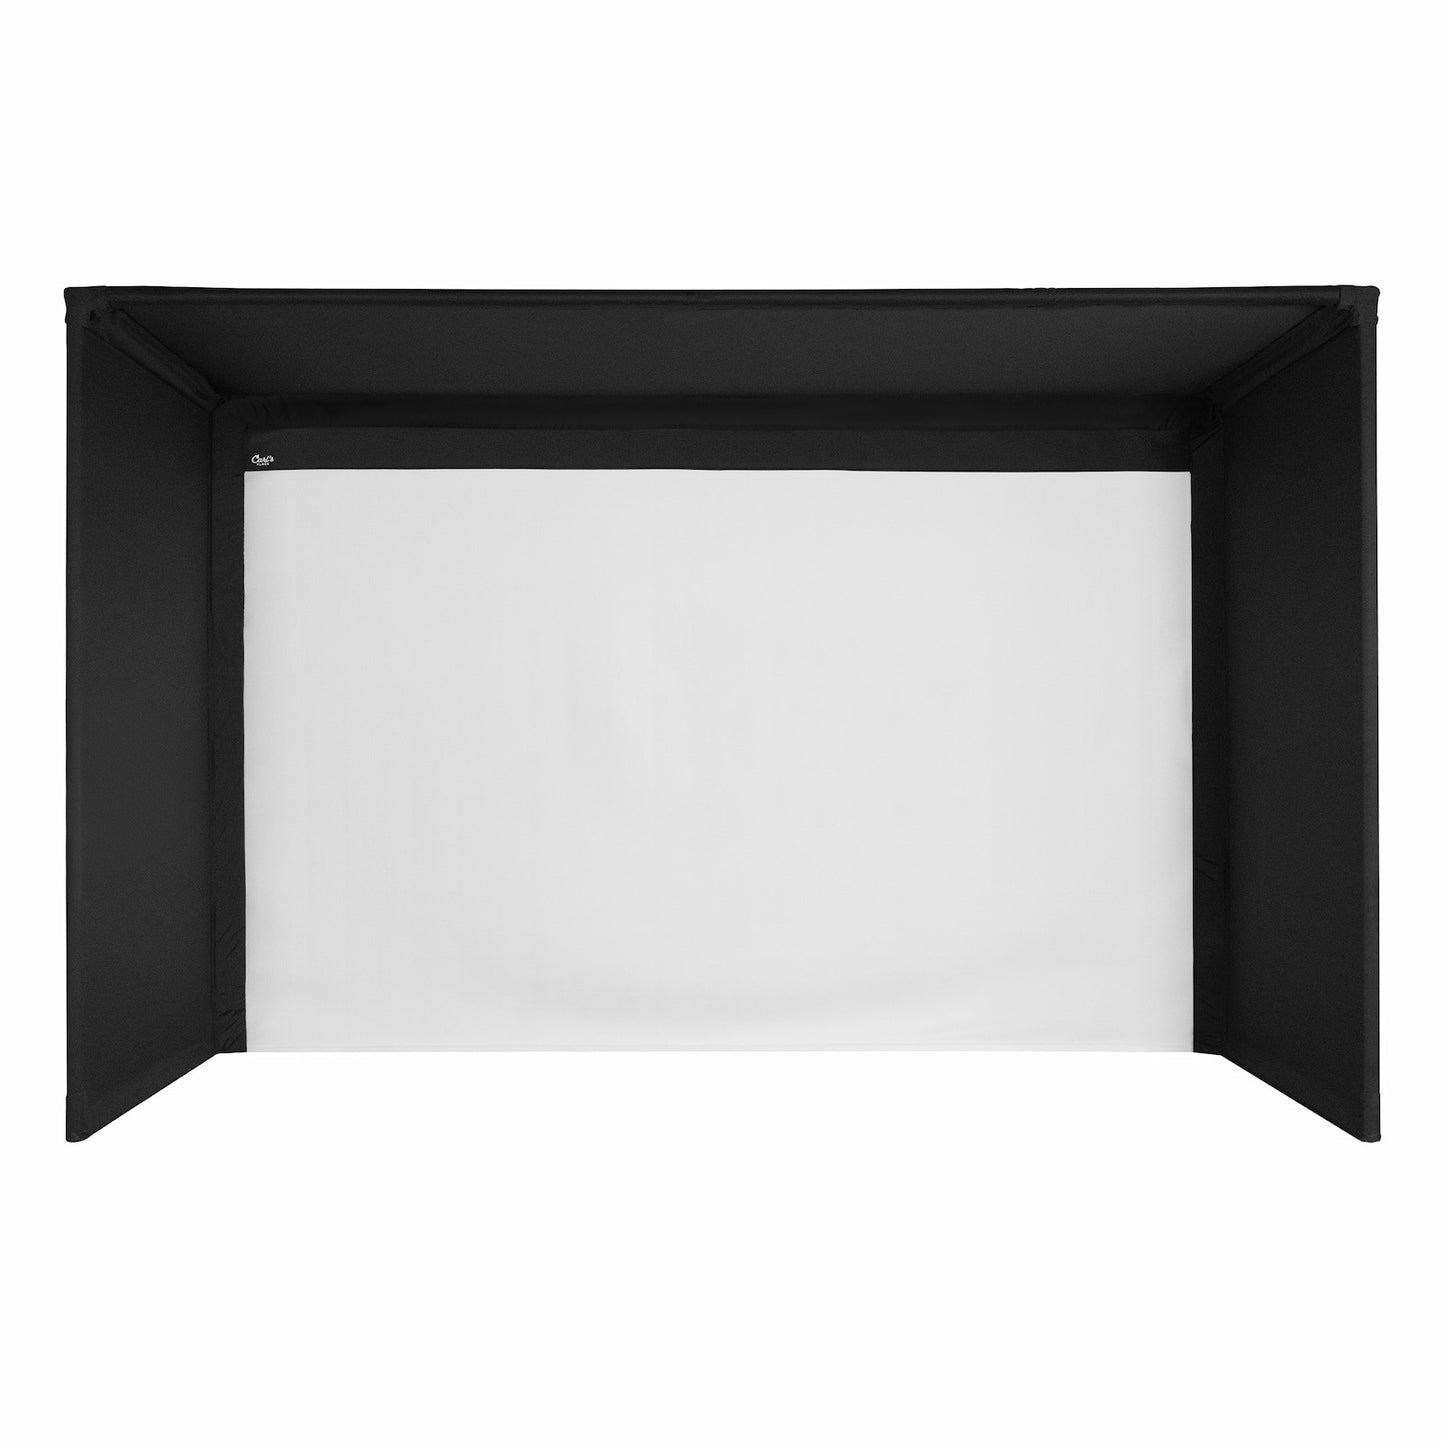
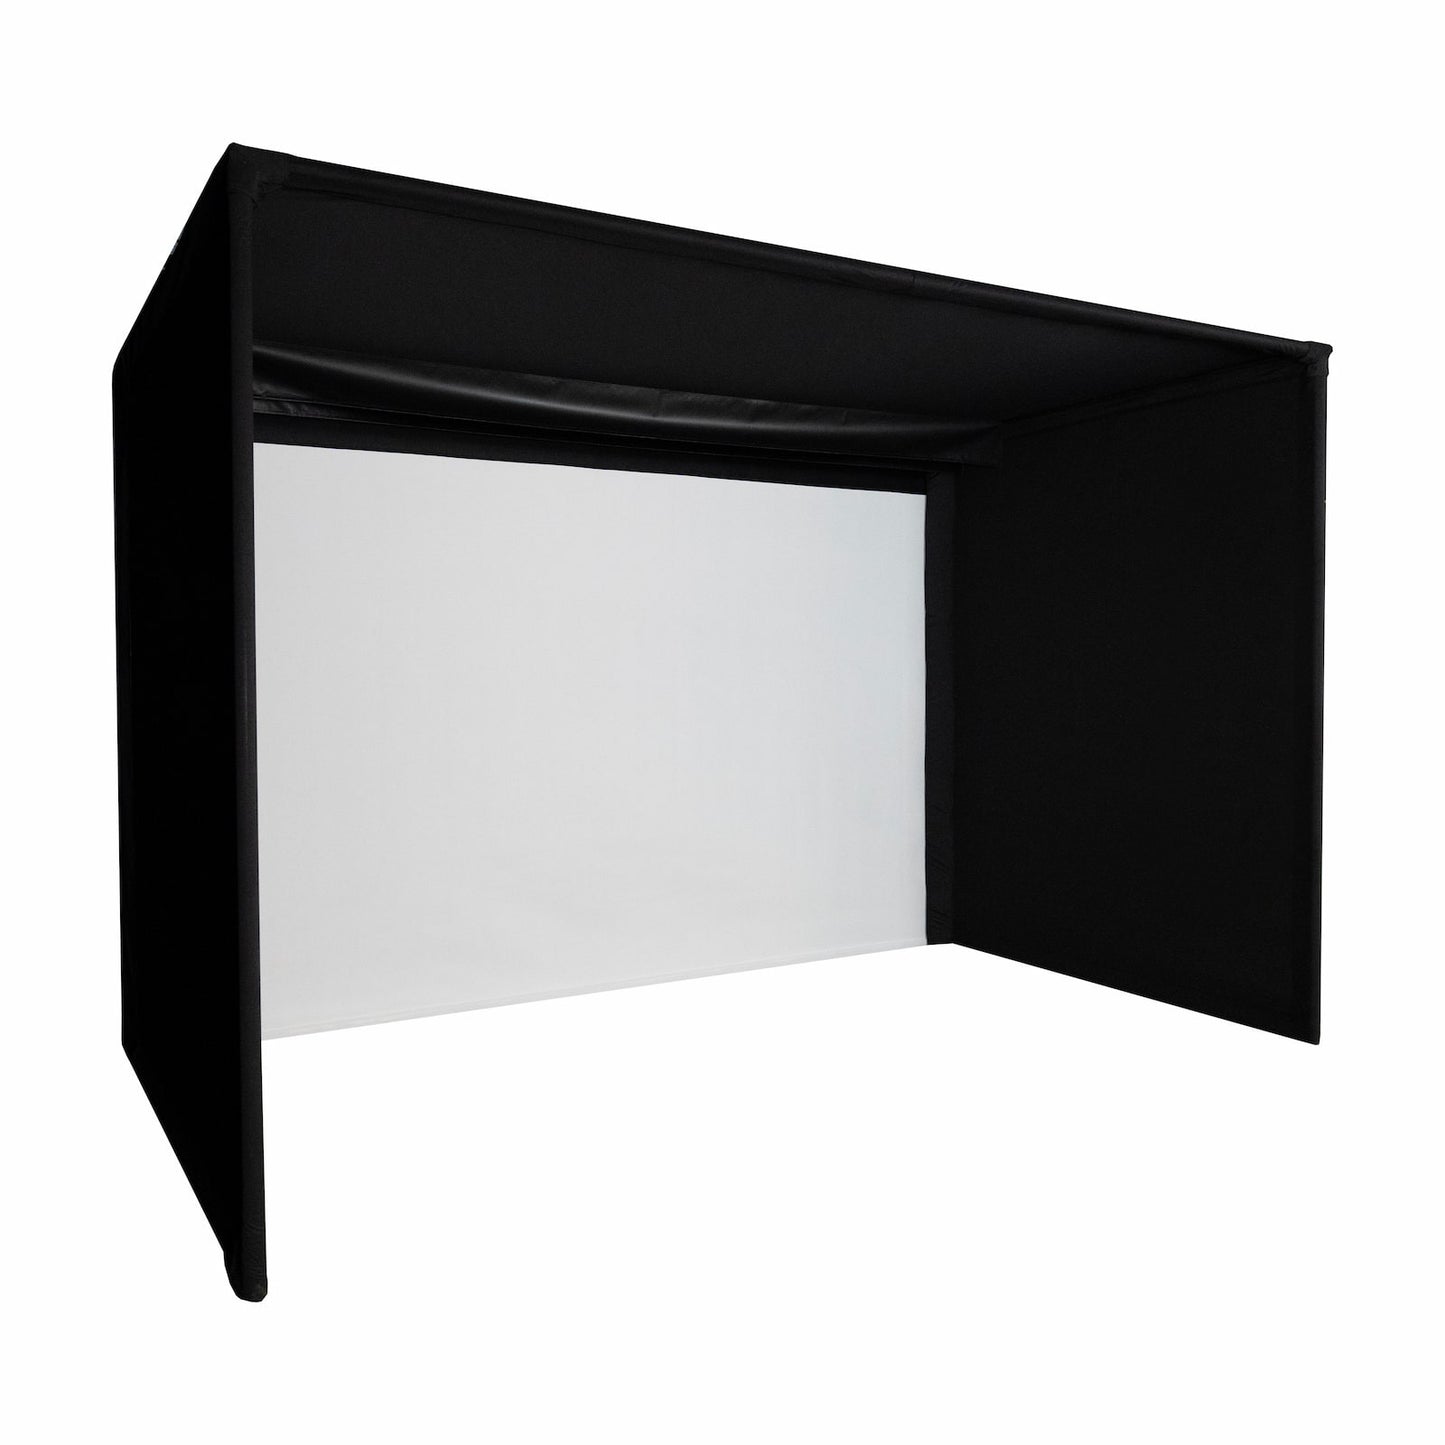
🖤 Black Knit Enclosure
The sleek black knit enclosure shades your screen for a bright, crisp image while creating a professional hitting bay. The side and ceiling panels protect your room from mis-hits, while the smooth black finish elevates the overall look.
🔩 Steel Fittings
Each kit comes with all steel corner fittings and elbows needed for frame construction. (Pipes sold separately.)
🔗 Ball Bungees & Zip Ties
Easily secure and adjust your screen with the included fasteners:
-
Zip ties for customizable screen tension
-
6” ball bungees to fine-tune slack vs. tightness based on your swing style, ball speed, spin, and hitting distance
We even include extras, so you can find your perfect balance between tension and flexibility.
Optional Add-Ons
🏗️ Pipe Framing Kit
While the Pipe Framing Kit is optional, the frame pipes themselves are required. Skip the hassle of cutting and hauling pipes from the hardware store — this kit includes pre-cut, labeled 2" EMT pipes in the exact lengths needed for the Pro Golf Simulator Enclosure. Just unpack and assemble.
🎯 Safety Baffles
Protect players and equipment with ceiling-mounted baffles. These hang down to stop high-angle shots from rebounding off the screen — an especially valuable upgrade for commercial golf simulators.
🧽 Foam Inserts
Add soft memory foam padding around the screen edges to prevent stray shots from striking the enclosure frame.
💡 Back Cover & Pipe Kit
Take your simulator to the next level with a light-blocking back cover. It prevents ambient light from leaking in and projector light from spilling out, creating the most vivid, lifelike golf experience possible.
-
Pipes sold separately: If you’re already cutting pipes for your enclosure, you can cut your own for the back cover too.
-
Or, order the Back Cover Pipe Kit for pre-cut pipes delivered to your door.
Resources
Enclosure Set Up
See our team build the Pro C-Series Golf Enclosure
See us frame mount a Uneekor Launch Monitor
EMT Requirements
Unless you've selected the Pipe Framing Kit add-on, you'll need to purchase 2-inch EMT (electrical metal tubing) from your local hardware store to complete your frame. We'll include all details on what lengths and quantities of EMT are required.
Please note, 2-inch EMT is the US trade name of the material, however, the true outer diameter is 2.197″ or 55.8mm.
FAQ
🛠️ Care & Use Information
📏 How Far Should I Stand from the Screen?
For both golfer and screen safety, stand at least 10–12 feet away when hitting into your impact screen.
🚫 Can I Iron or Steam the Screen?
-
Ironing: Not recommended, as heat can permanently damage the material. To avoid wrinkles, unpack your screen right away and loosely fold if storing.
-
Tensioning: Attaching your screen with zip ties or ball bungees and allowing it to relax for a few days will smooth out most creases.
-
Steaming: A clean, consumer-grade steamer with distilled water can safely help remove stubborn wrinkles without leaving water marks.
🧼 Can I Wash the Screen?
We don’t recommend traditional washing. Instead, see our guide: “How to Clean Your Golf Impact Screen.”
⚠️ Golf Simulator Safety Tips
-
Always follow the assembly manual provided
-
Keep children, pets, and spectators out of swing range
-
Protect ceilings, walls, windows, and nearby property
-
Review our Terms of Sale before use
🟩 Do I Need a Golf Hitting Mat?
Yes — hitting mats protect your joints and provide a realistic swing surface.
-
4’x5’: Great for most golfers, allows driver swings comfortably
-
5’x7’ or 4’x9’: Ideal for wide stances or shared setups (left- and right-handed golfers)
🏗️ Golf Enclosure Information
🔹 Types of Enclosures
-
DIY Kit: Affordable entry-level enclosure, great for home setups
-
Pro Kit: Larger bays with extra safety features for advanced or commercial use
-
Curved Kit: Adds a seamless curved screen for panoramic immersion
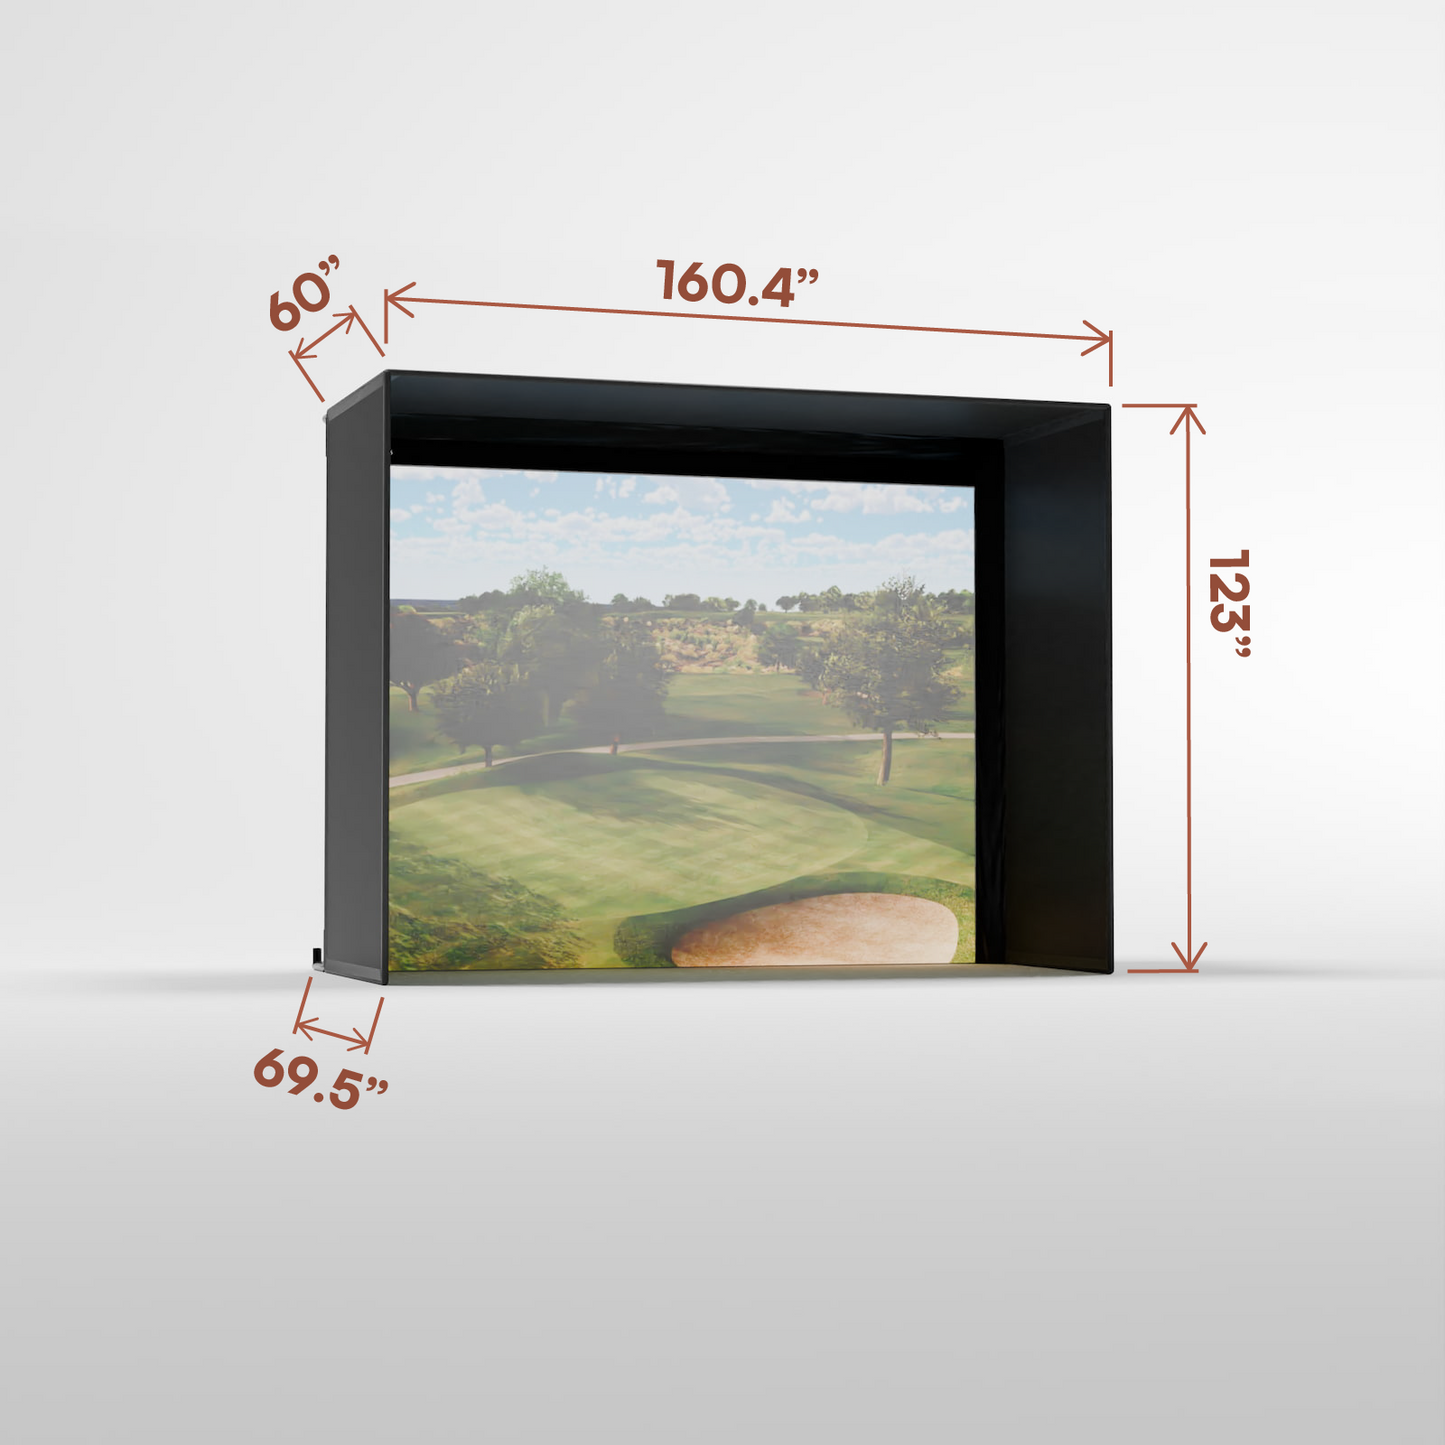
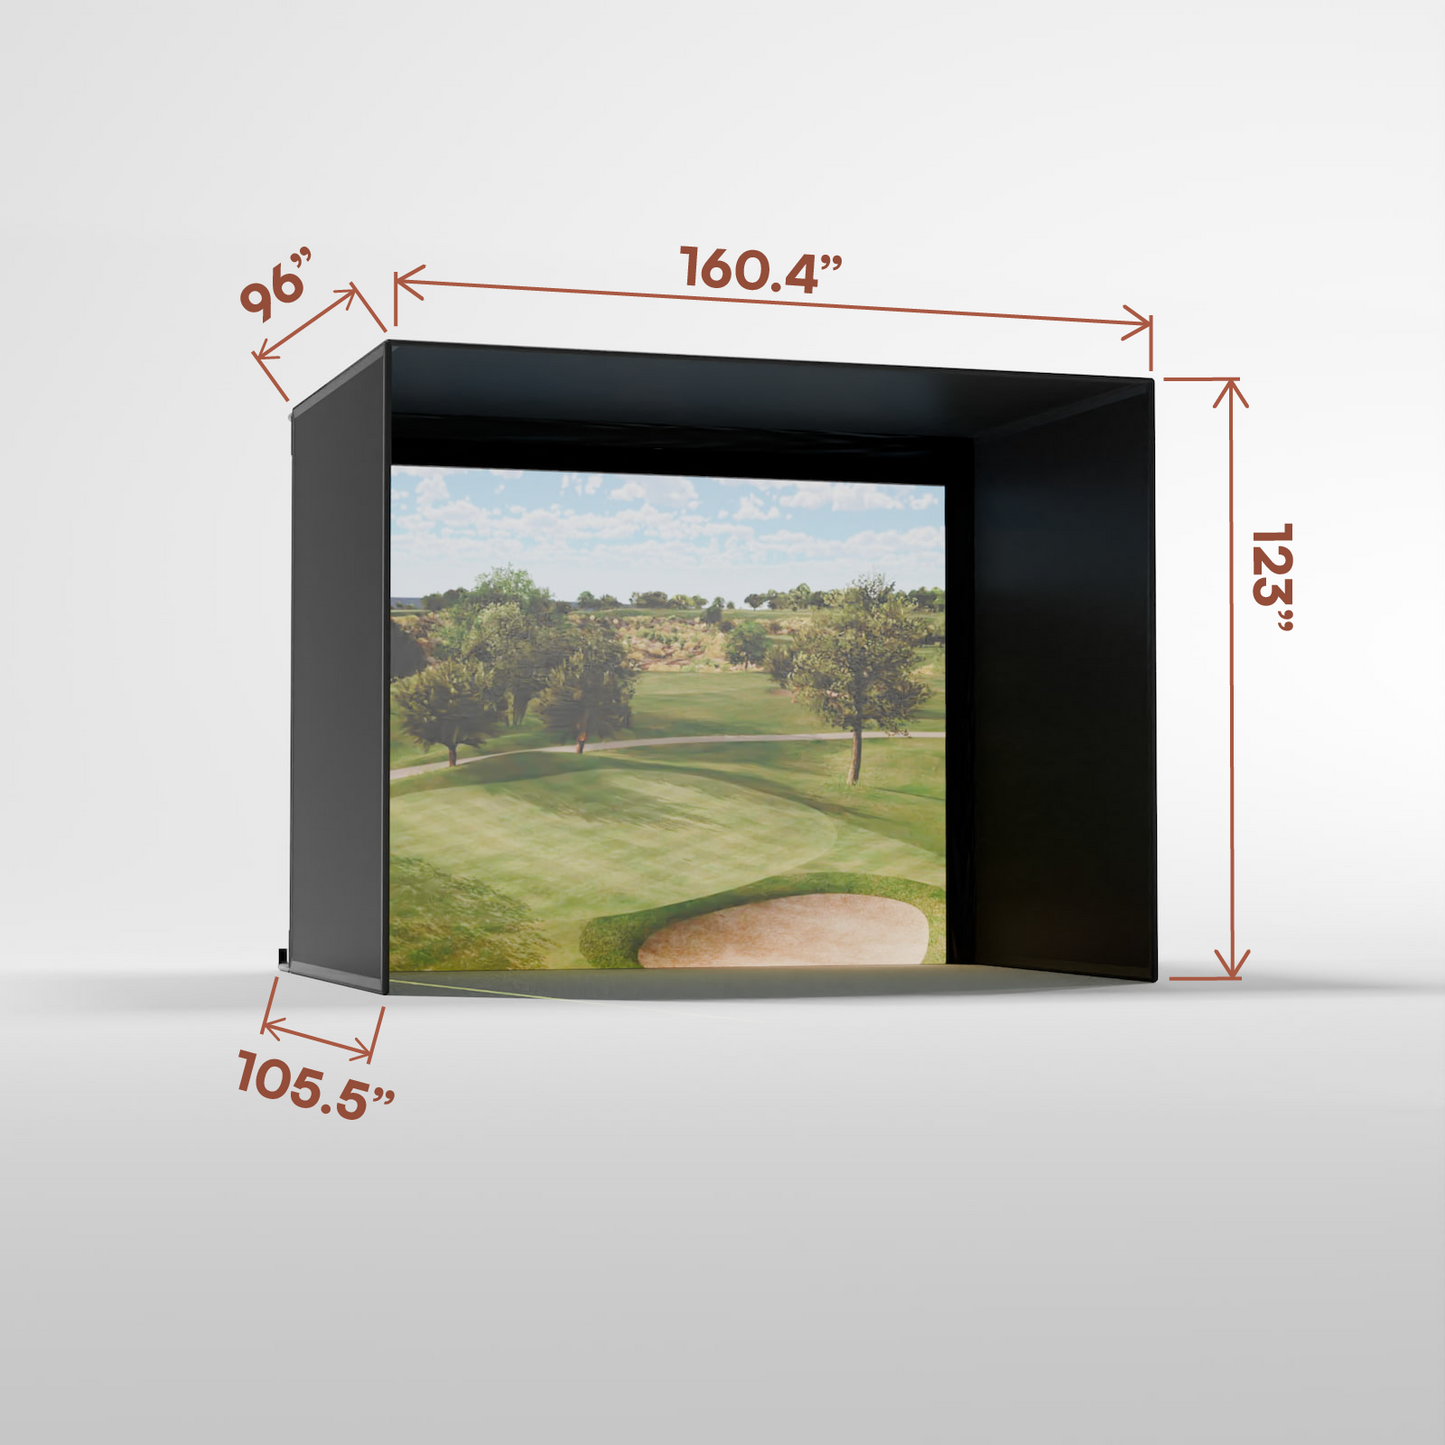
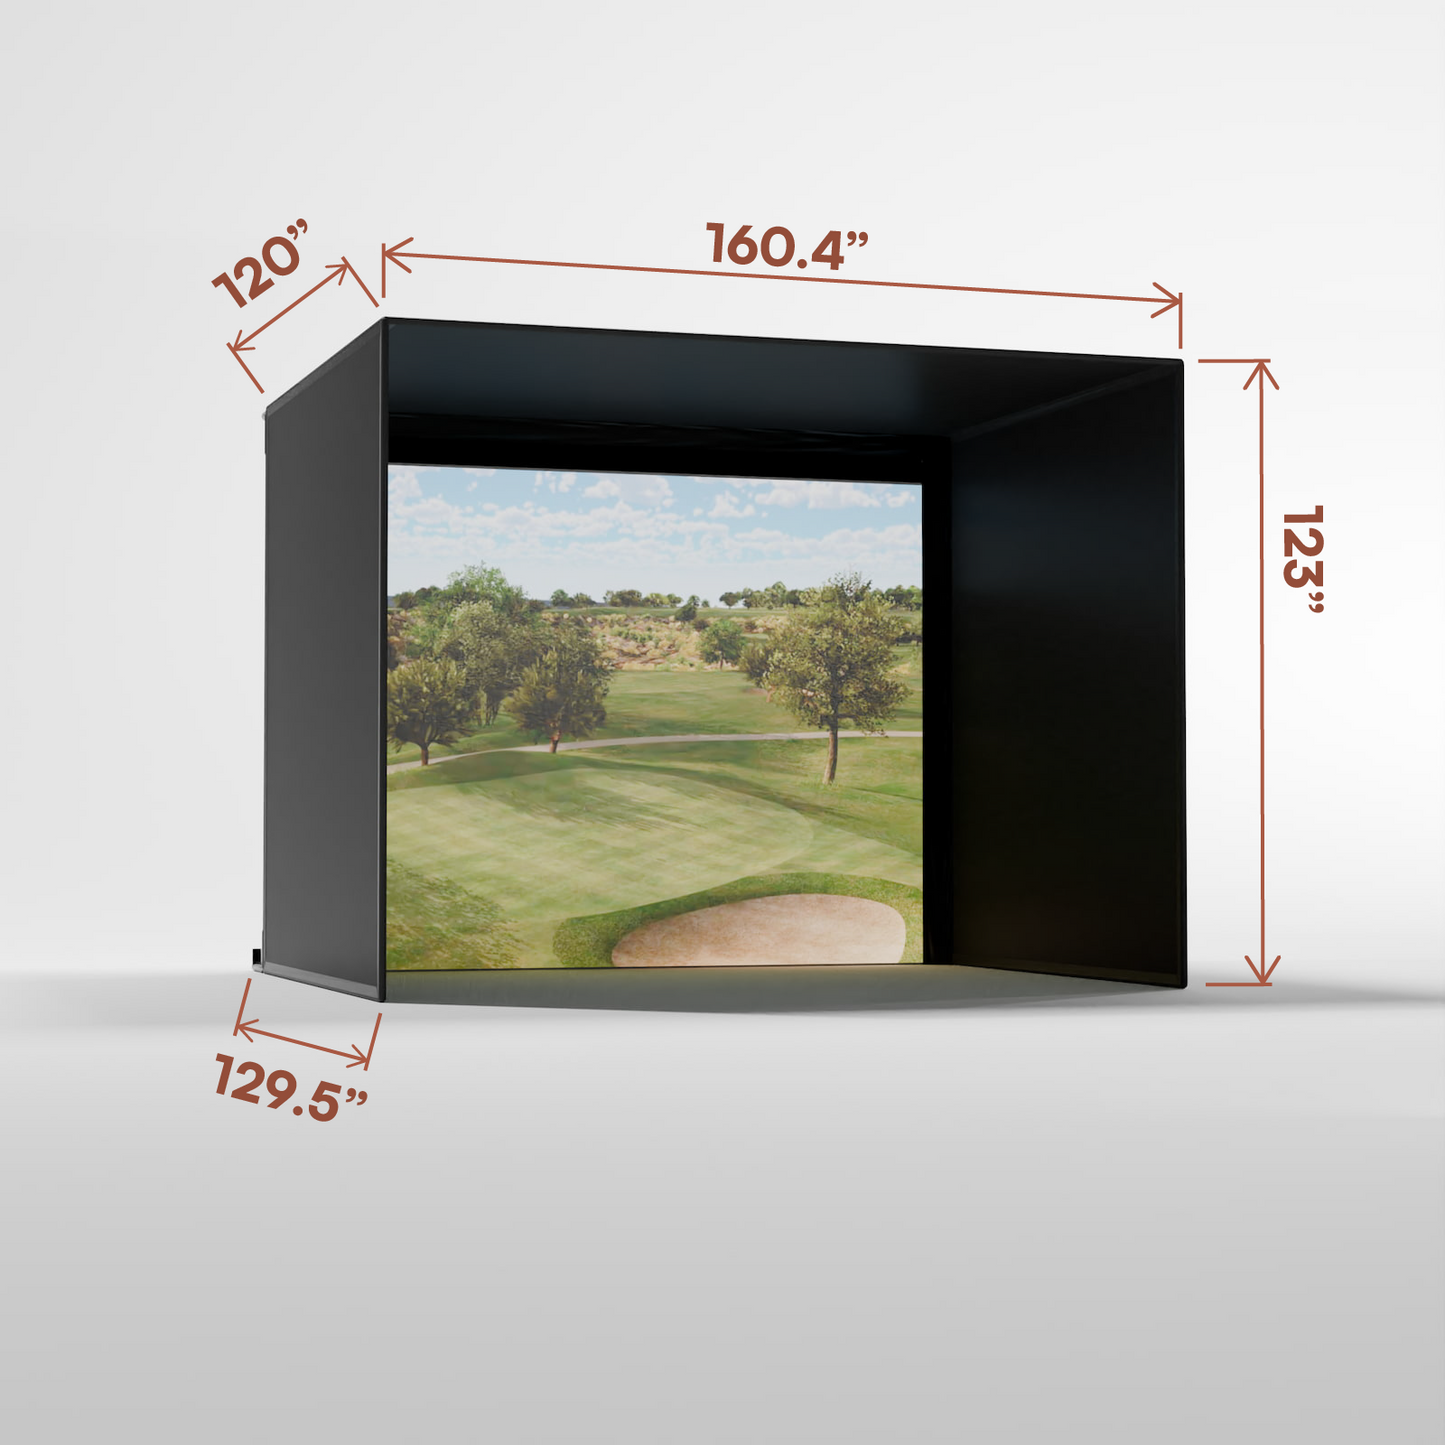
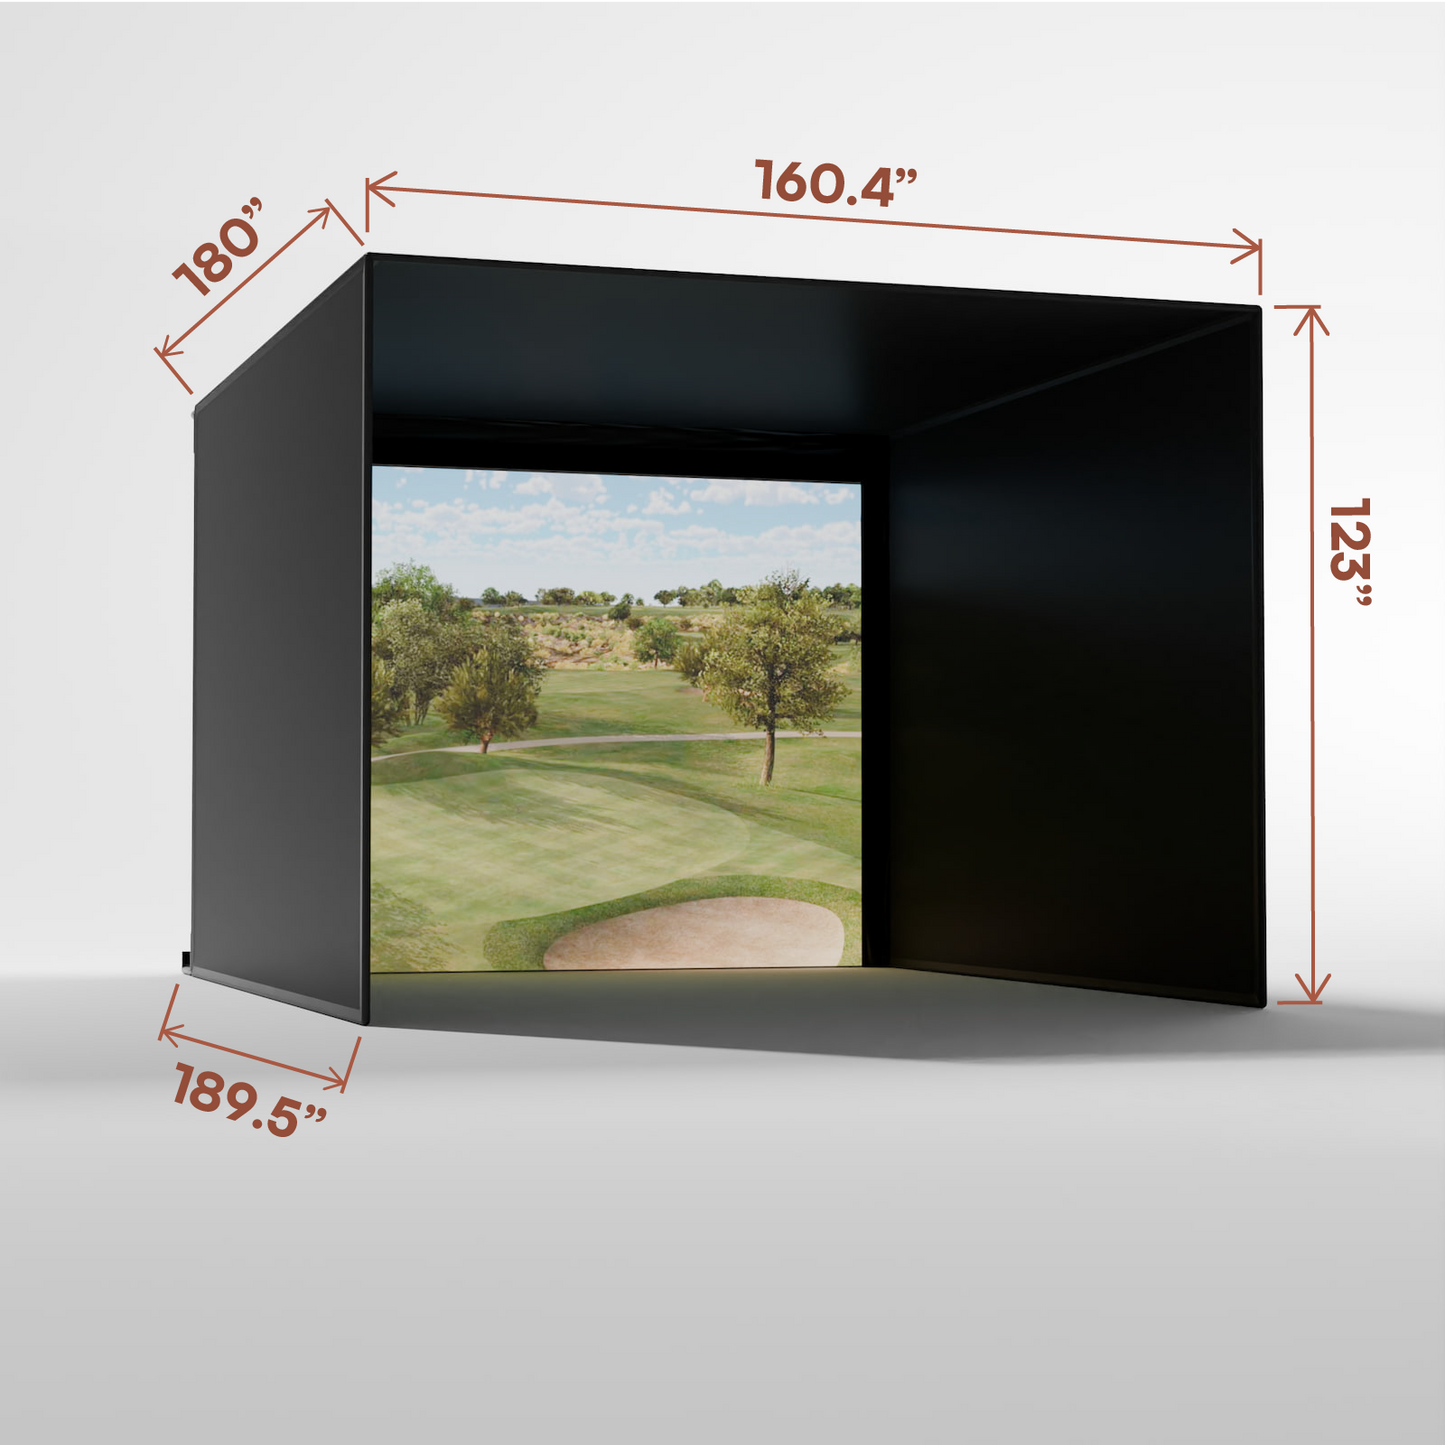
📐 How Much Space Do I Need?
When planning your simulator, consider:
-
Buffer space away from walls & ceilings
-
The full footprint of the enclosure (C-Series adds ~9.5" of depth with backset fittings)
-
Minimum standing distance of 10–12 feet
-
Golfer height & club length
-
Turf thickness, ducts, soffits, and furniture clearance
-
Access to doorways
🚚 Shipping & Production Time
Enclosures are made to order for precise sizing. Production times vary by demand. Add the item to your cart and enter shipping info to view estimated delivery times.
🎯 What If the Black Enclosure Gets Hit?
The black nylon is not designed for direct hits. However, if balls bounce off the white impact screen and into the black panels, no issues should occur.
🔄 Replacement Screens
Replacement screens are available — contact our team at 704-981-6501.
🔧 Installation
🏗️ Pipes Required
-
DIY Kits: 1" EMT (Electrical Metal Tubing/Conduit)
-
Pro & Curved Kits: 2" EMT (more difficult to source — check availability)
👉 Add a Pipe Framing Kit for pre-cut, labeled pipes to simplify assembly.
⚠️ Pipe Framing Kits ship freight. If you cannot unload a pallet of 50lb boxes, add lift gate service. For customers outside the U.S., shipping may be cost-prohibitive.
⏱️ Assembly Time
Pro Golf Simulator Enclosures take about 3 hours to assemble. Extra hands are helpful for lifting and connecting frame pipes.
🔎 What is EMT?
EMT = Electrical Metal Tubing/Conduit (not PVC). It provides the sturdy frame structure for your enclosure.
📽️ Projector Placement Options
Your projector’s specs determine throw distance and image size. Common mounting methods:
-
Above your hitting mat
-
Ceiling flush-mount (for low ceilings)
-
Ceiling drop-mount (for high ceilings)
-
Frame-mount on Pro Enclosures
-
Floor-mount with a protective case
🔗 How to Use Ball Bungees
-
Insert loop end into grommet from behind the screen
-
Pull through until toggle ball touches the grommet
-
Wrap cord around frame
-
Hook cord over toggle ball to secure
Ball bungees (plus reusable zip ties) let you fine-tune screen tension for the perfect balance of tightness vs. flex.